Deploying Microservices App on AWS Elastic Container Service
By Tom Ratcliff
❤️ Huge thanks to Nick White for capturing these notes while deploying
VPC Setup
Log into AWS, then click the Services tab. Within Services, go to VPC:
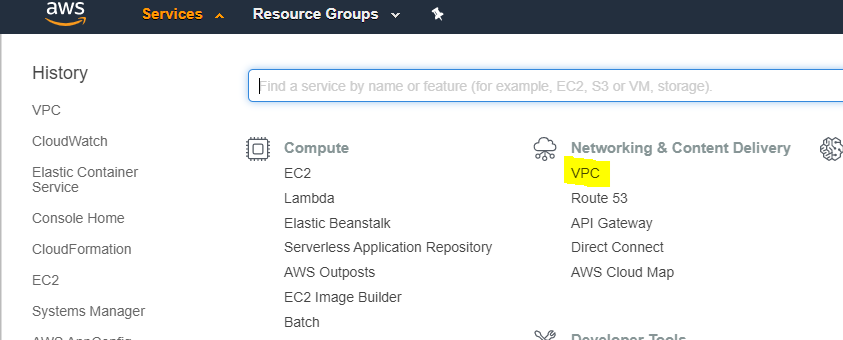
Then select Create VPC:

Mimic these settings, but beware of existing IP conflicts. This will create all resources required to get started (public and private subnets, NAT gateway, etc):
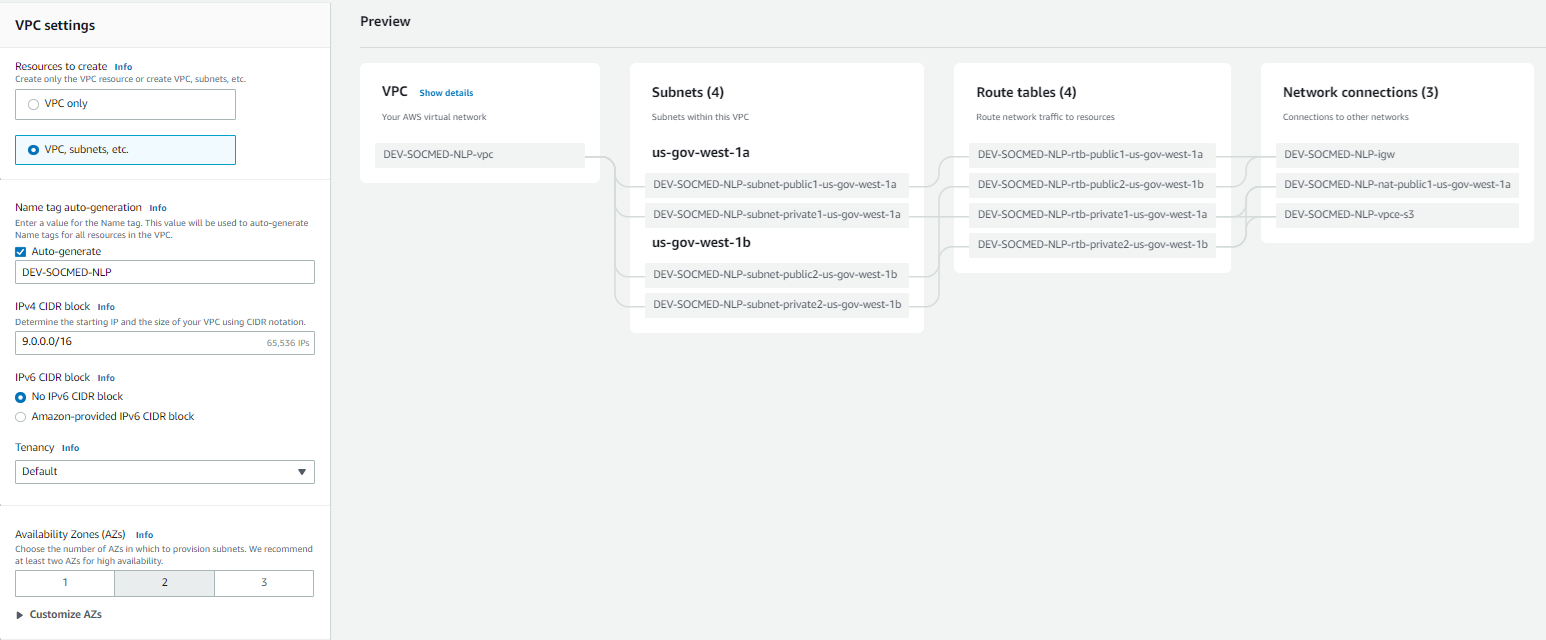
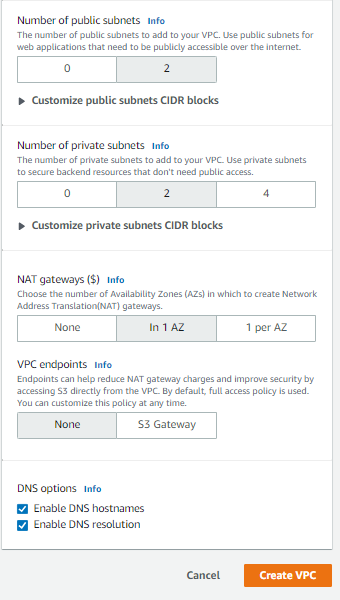
Now you can select Create VPC. Please allow 5-10 minutes for full creation.
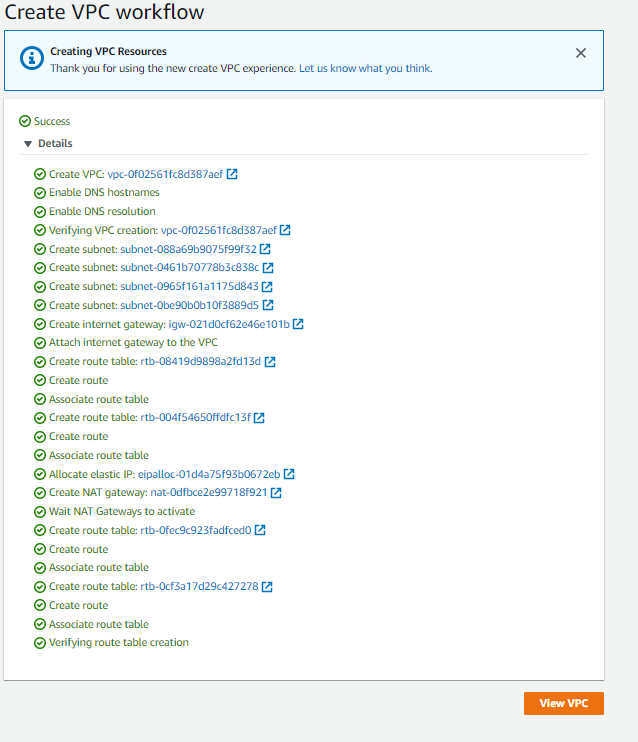
After all the resources have provisioned, you should see the success of the workflow:
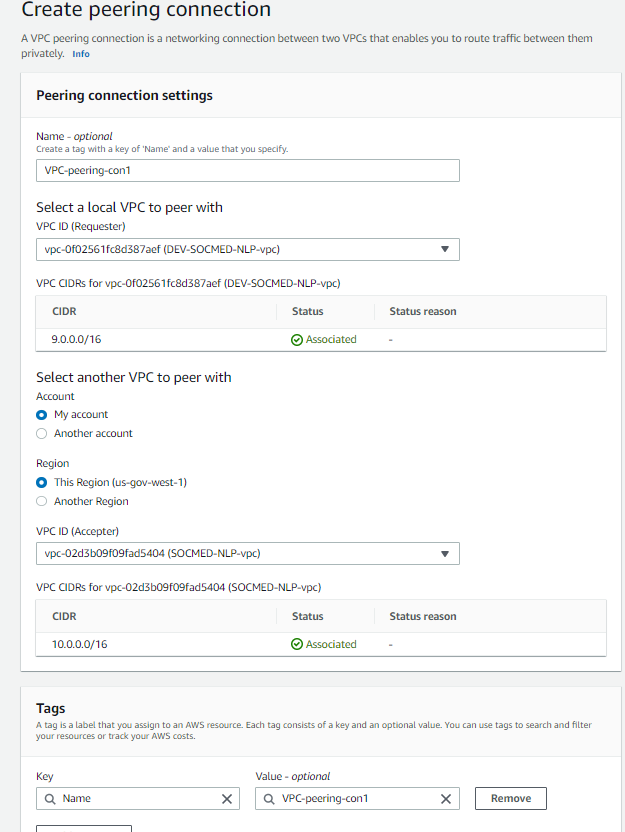
Now, we want to set up VPC peering between this VPC and the PROD VPC. From the VPC Service menu, select Peering Connections from the left side. Then select Create Peering connection from the top right. Populate this information:
Now, we need to accept the connection from the AWS console. It should be in the top right menu somewhere (sorry, no screenshot ☹ )
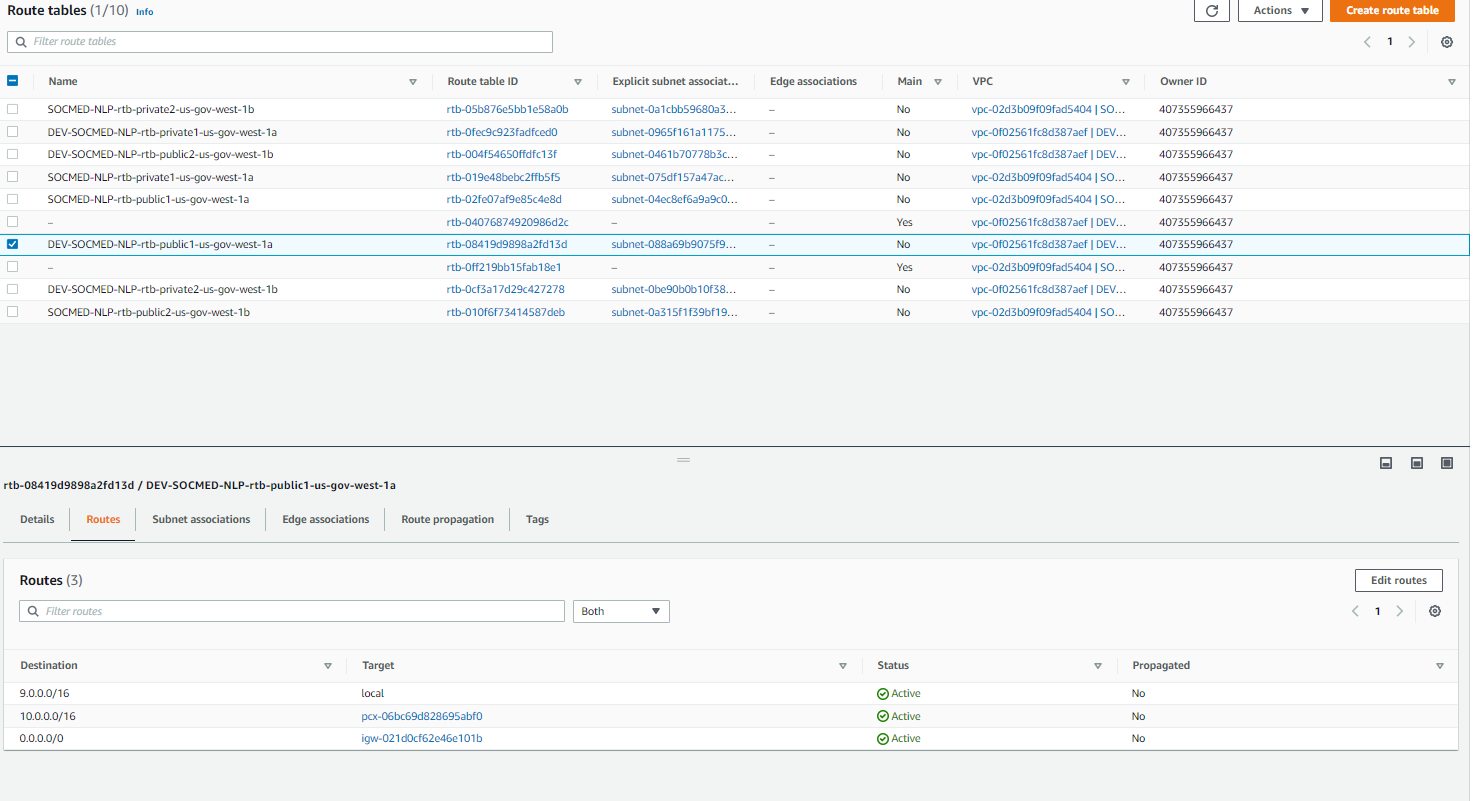
Navigate to the Route Tables menu from the VPC service menu from the left hand side. We will be adding the VPC peering connection and subnet via the Edit routes menu on EACH of the route tables:
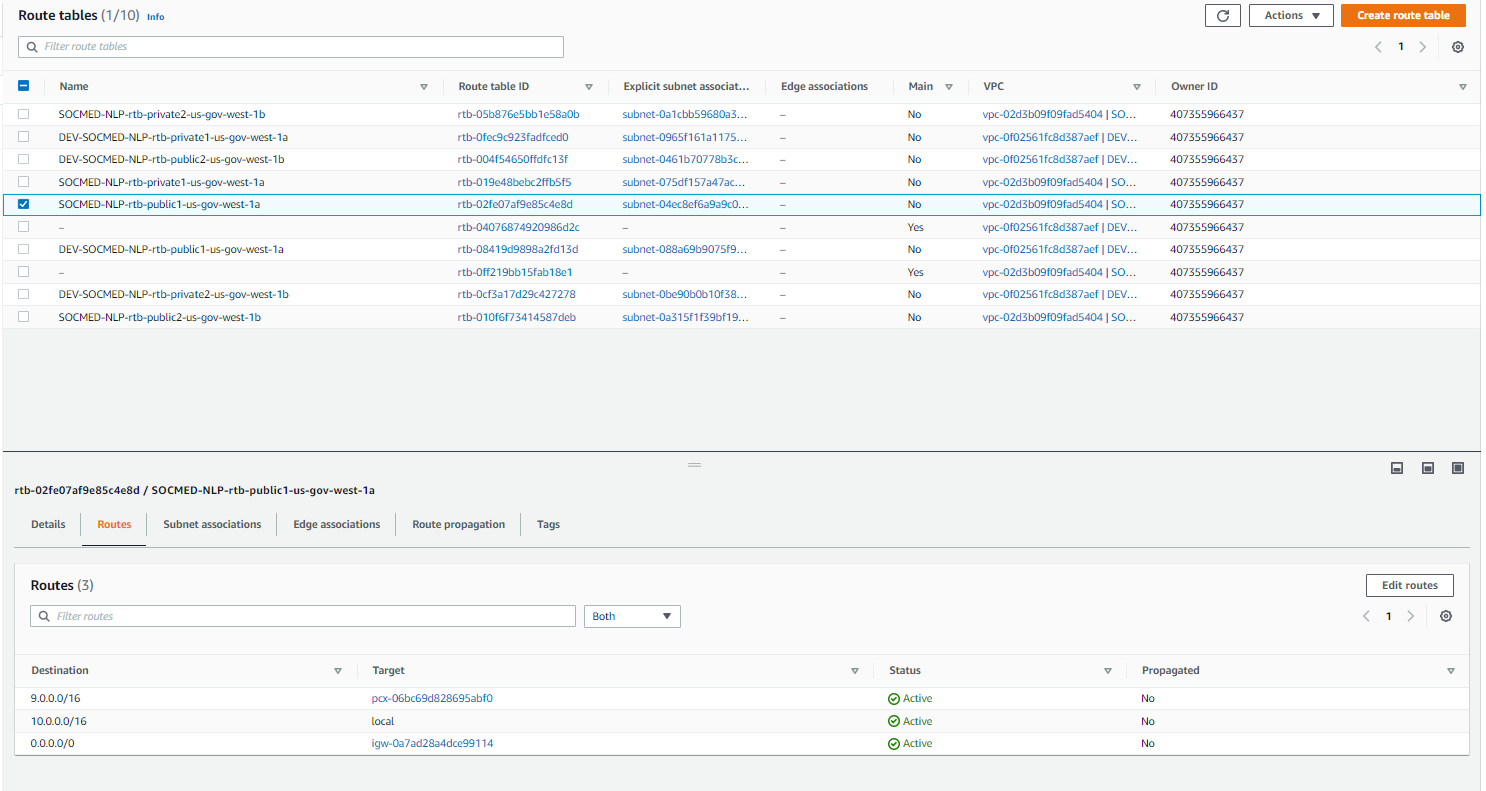
Congratulations, you have successfully created a VPC and it’s various networking pieces!
Target Group Setup
From the Services tab, select EC2. From the EC2 Dashboard, under Load Balancing, select Target Groups:
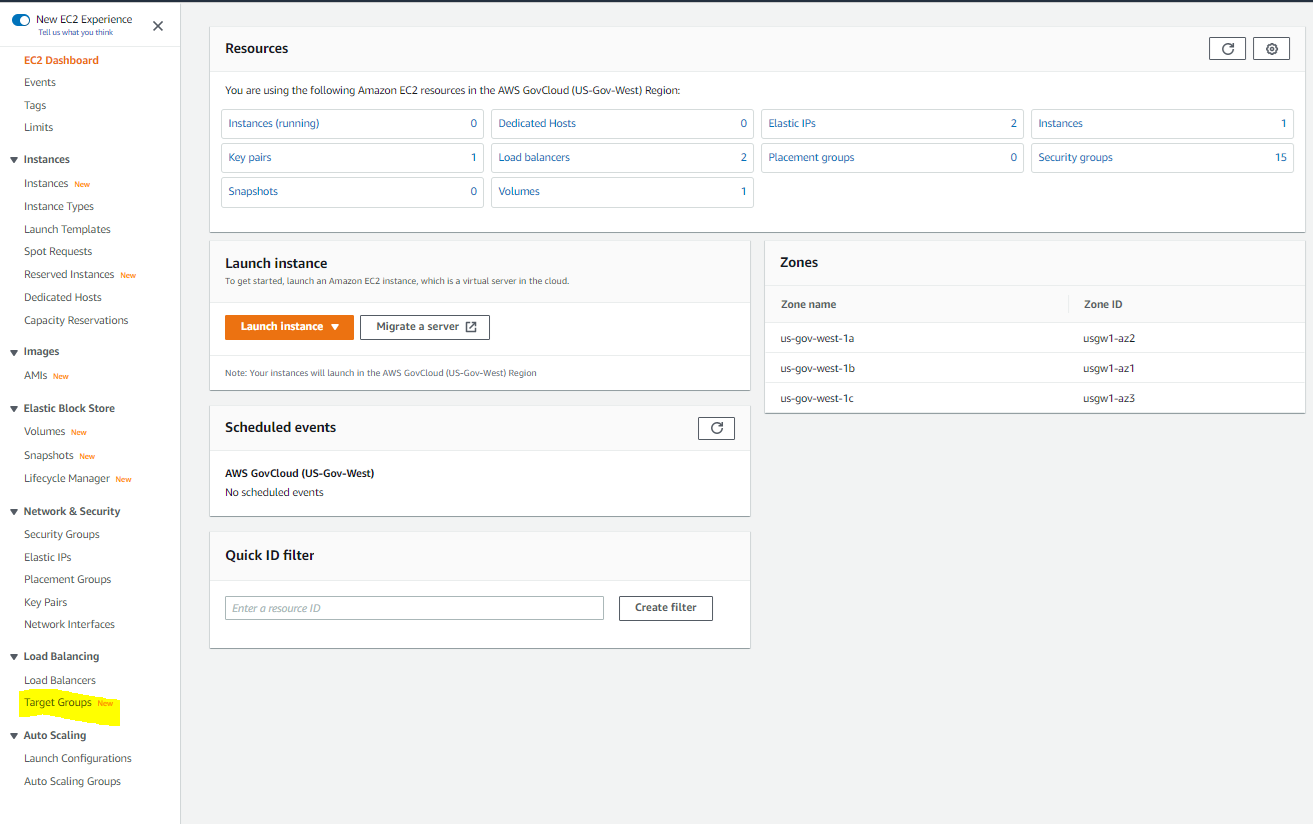
From the EC2 Target Groups submenu, select Create target group:

For this example, we will be recreating an IP Address based Target Group. We will be leveraging the port numbers based on each of the microservices. These can be found in their own respective GitLab projects. For this example, we are creating the DEV-ecs-query TG.
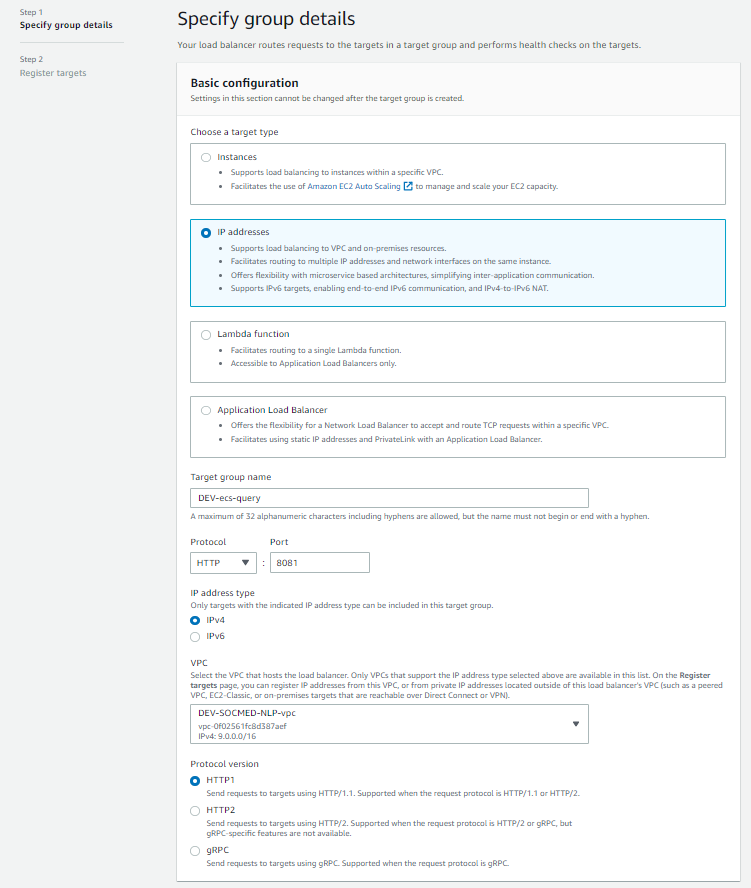
The health checks can also be found within GitLab:
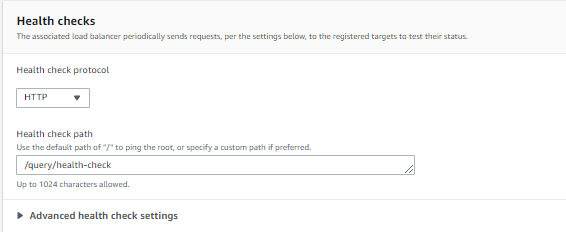
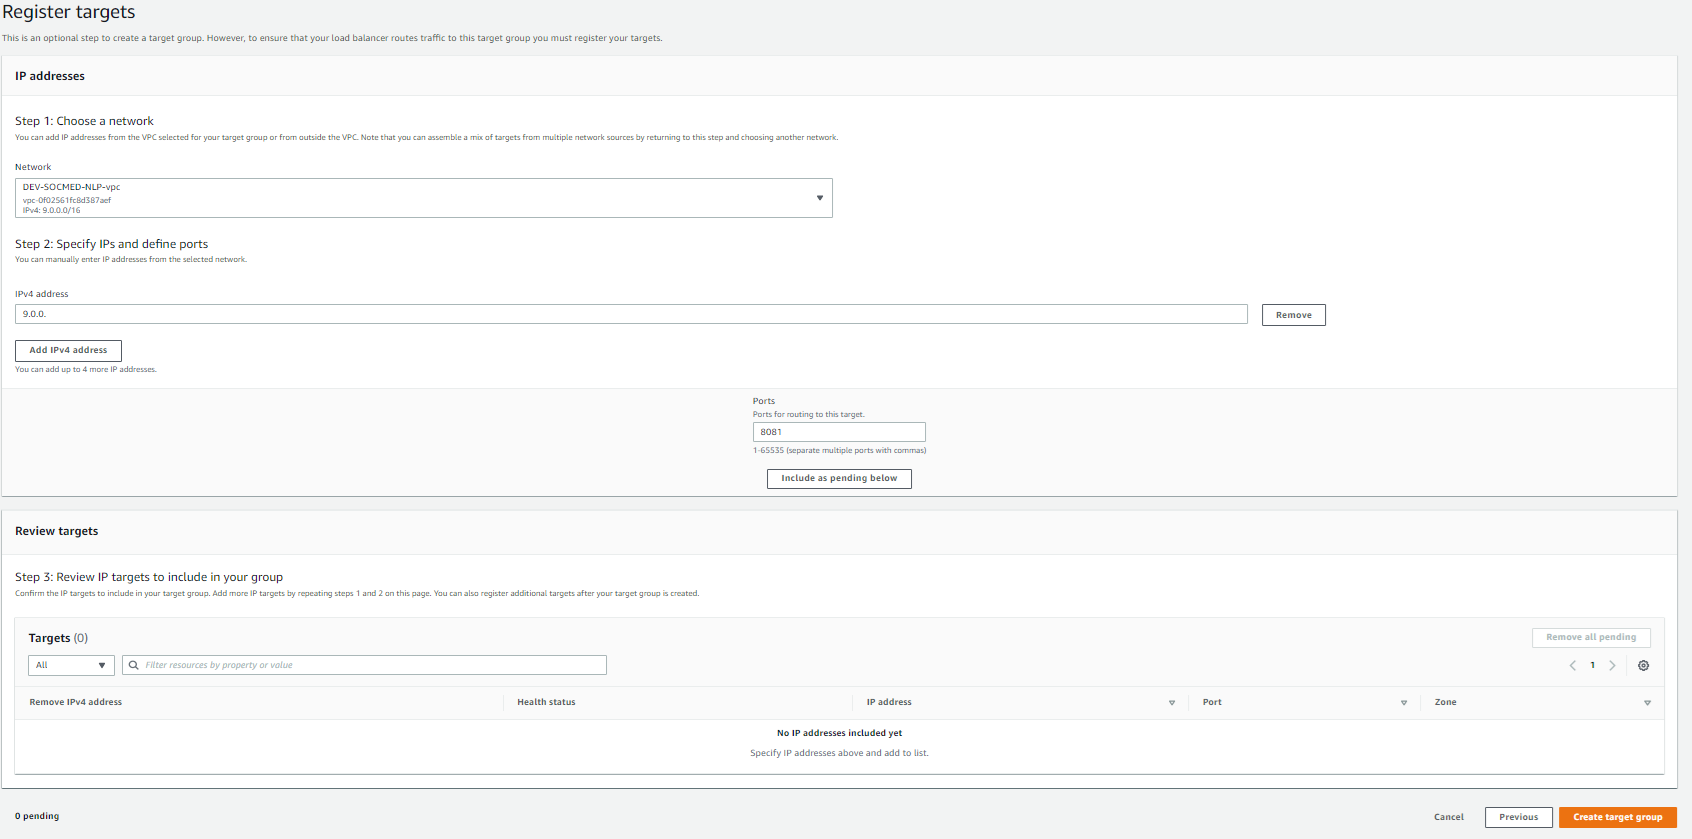
Select next, and do not enter anything on the next page. The reason for this is because we currently do not have any loadbalancers or containers built. We can now create the TG.
You can repeat this same process with a few changes (name, port, and health check endpoint) for the remaining of the IP Address-based Target Groups. Now we can provision an Application Load Balancer TG. Enter the information below, and select Next:
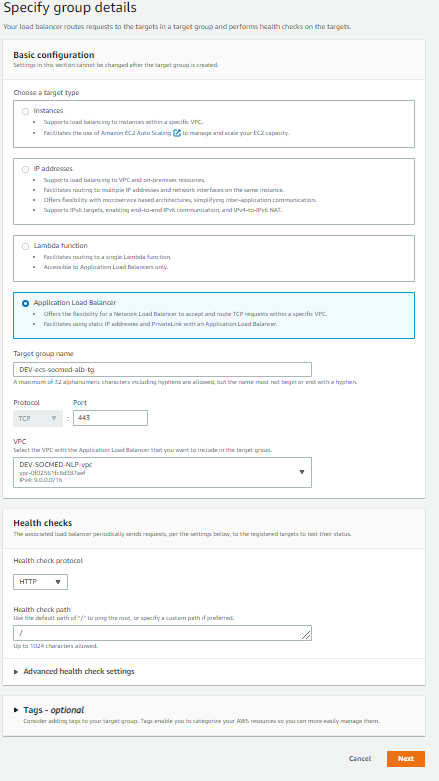
Select Add an Application Load Balancer later, and then Create the target group:

After repeating the previous IP Target Groups, your list of TG’s should look something like this:
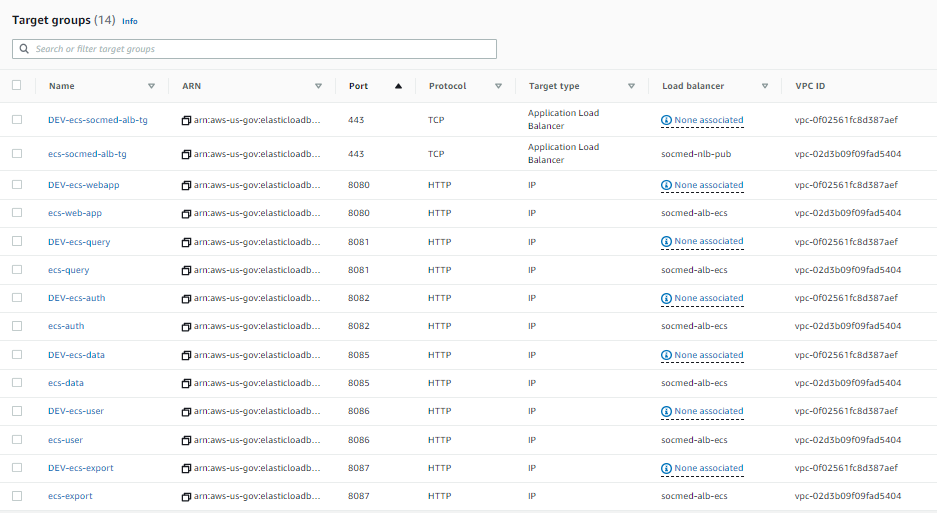
Take note of the Load balancer column. We will be manually adding these in guide 04, ALB and ELB.
Security Group Setup
After provisioning the ECS Cluster and Load Balancers, we should have all the security groups we need. We can now add all the rules necessary. Go to EC2 in the AWS Services Tab, then Security Groups on the left:
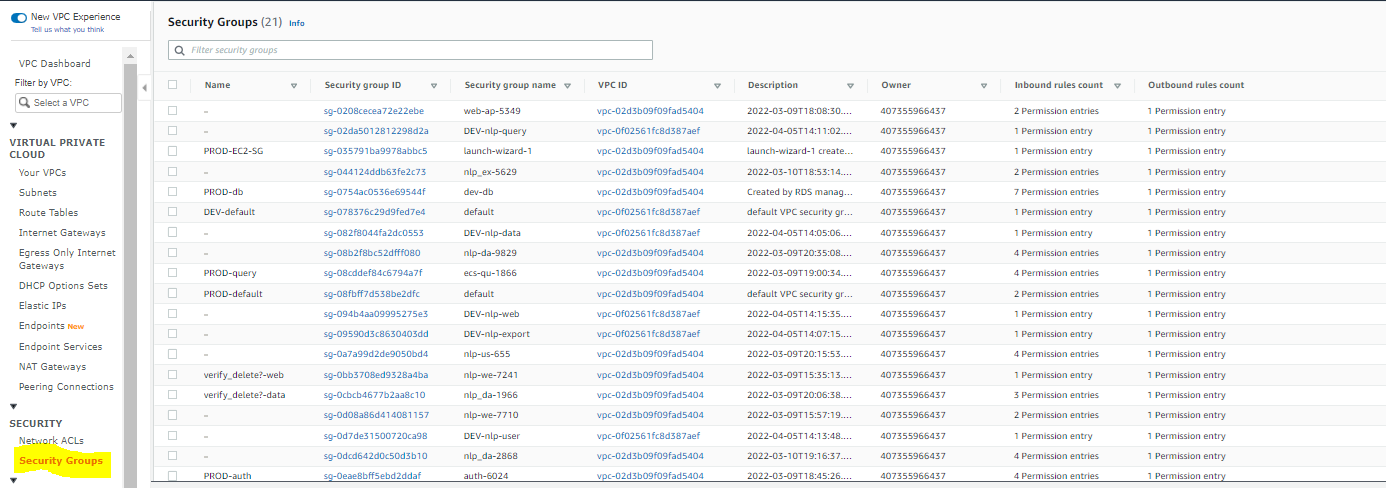
Now, in the DEV-default security group, we are going match the rules to the PROD-default security group:

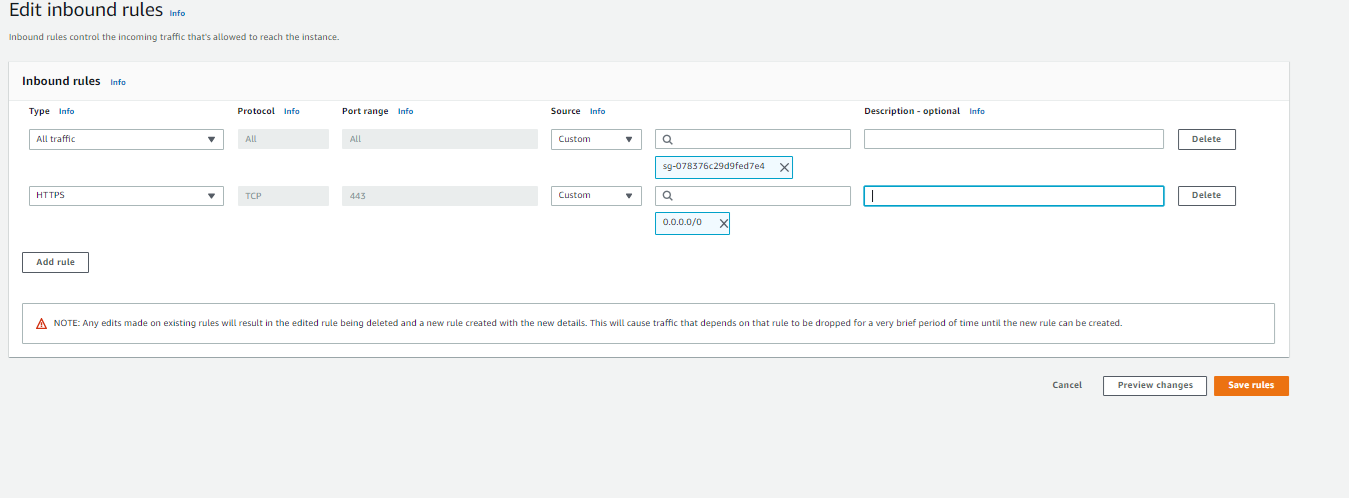
We can see that the the PROD-default group has two rules. One of the rules points back to the PROD-default security group, so we will add those now, by selecting the DEV-default group, then select Edit inbound rules to reach this page:

From here, we can add/modify rules. Once added, select Save rules:
Now, we can match up the service groups to their respective DEV counterparts. Since we are leveraging the prod db, all DEV SG’s that require a DB SG will use the PROD SG. Otherwise, any rule that points to a PROD SG will be pointing to it’s DEV counterpart instead.

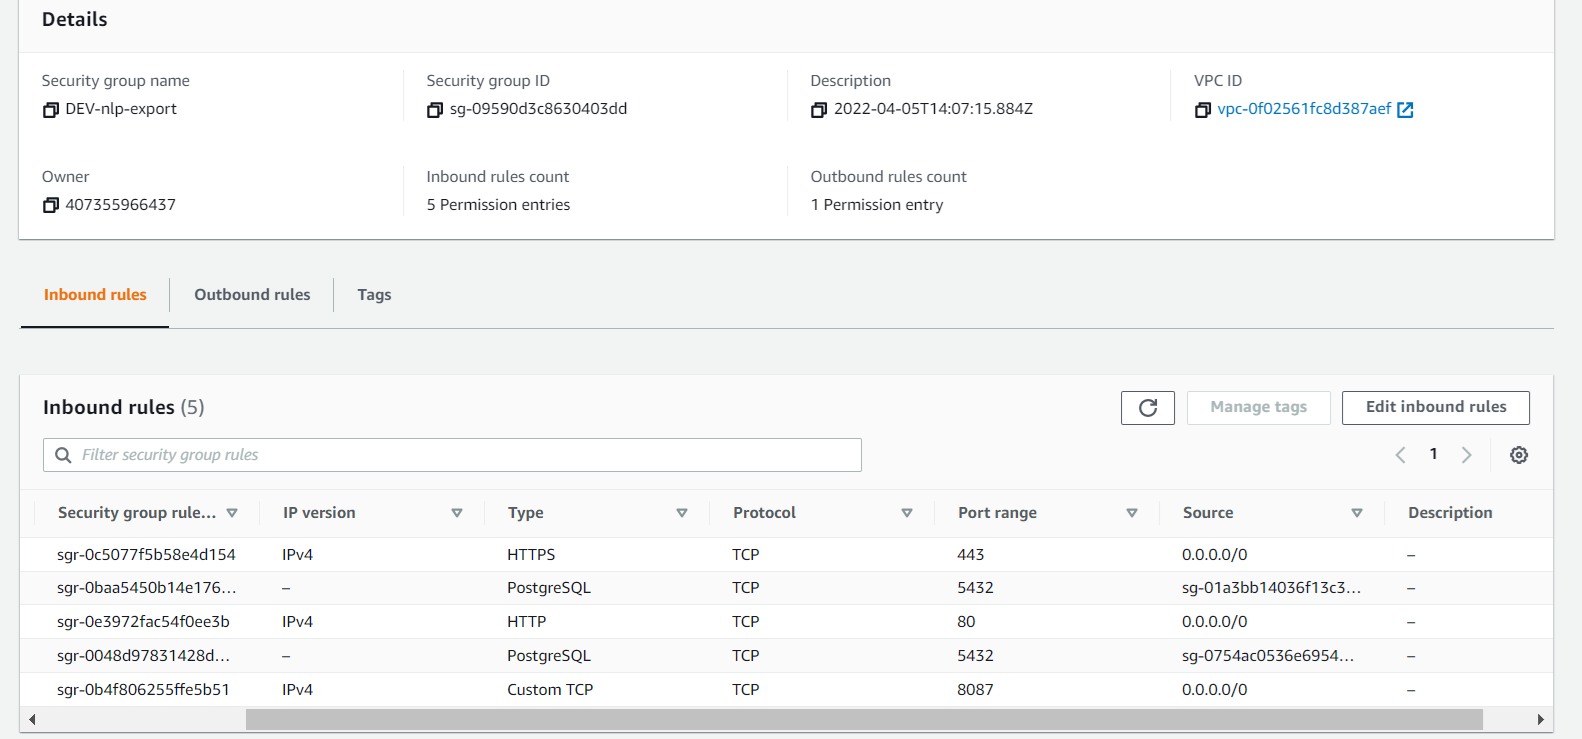
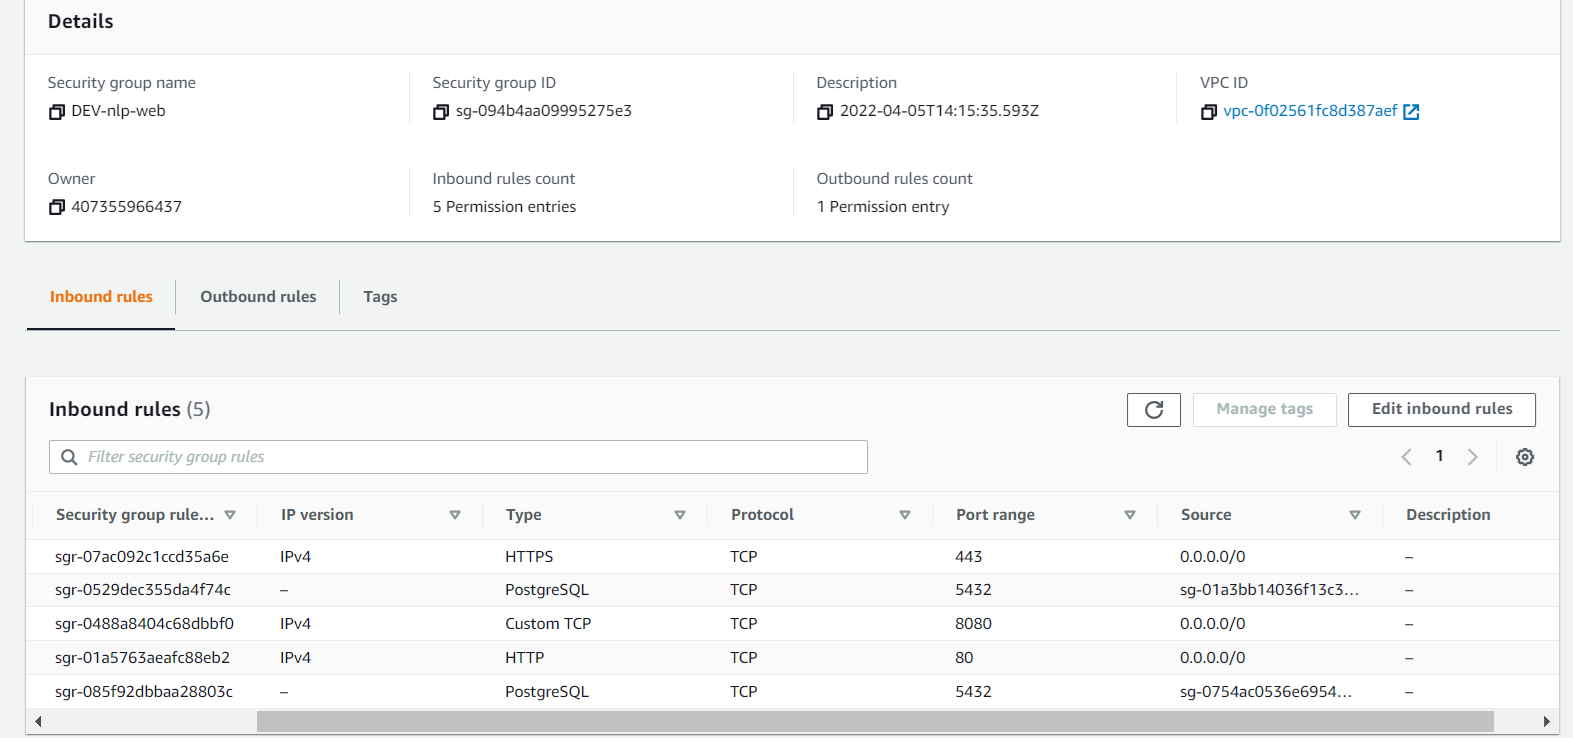
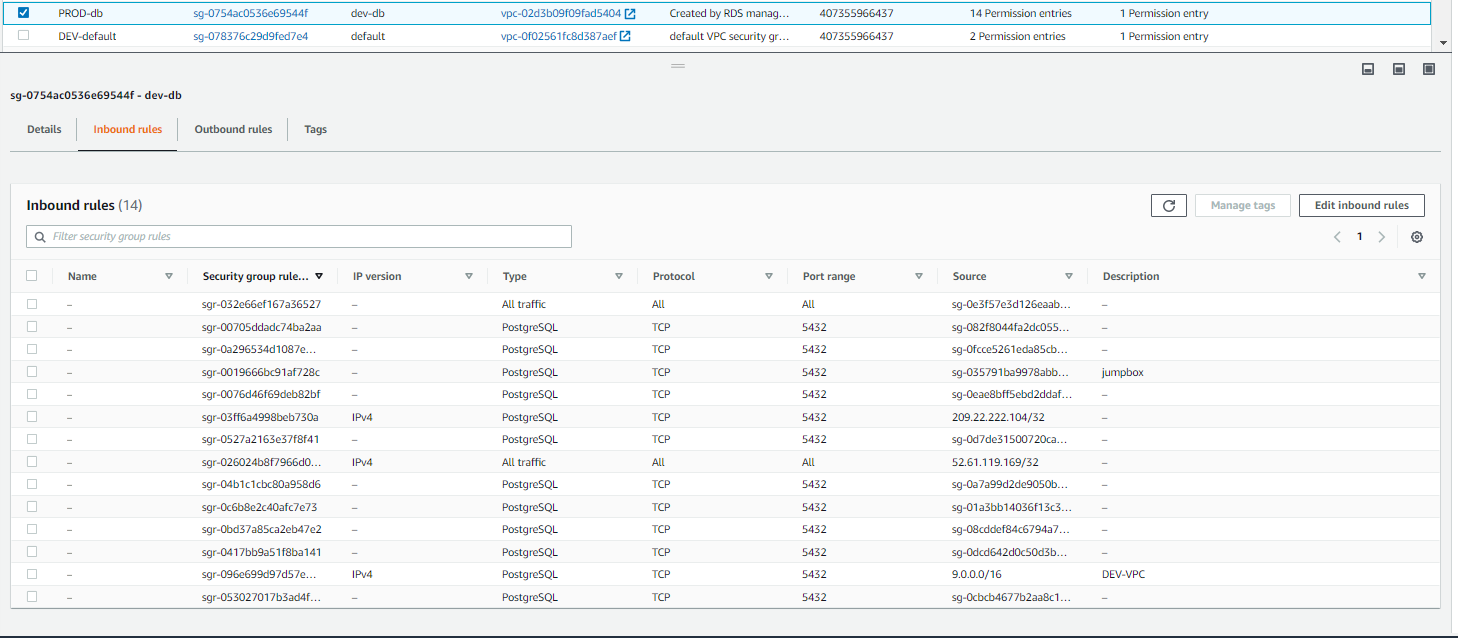
Ensure that the PROD DB SG has all relevant rules. This will include allowing traffic from the DEV VPC.
Application and Network Load Balancers
Within AWS, select EC2 from the Services tab. Then select Load Balancers. On that page, select Create Load Balancer:

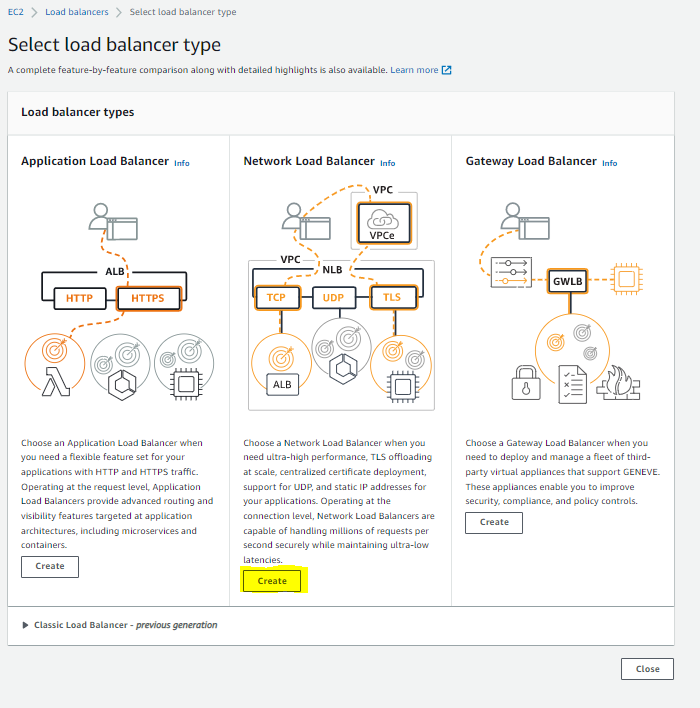
Choose NLB:
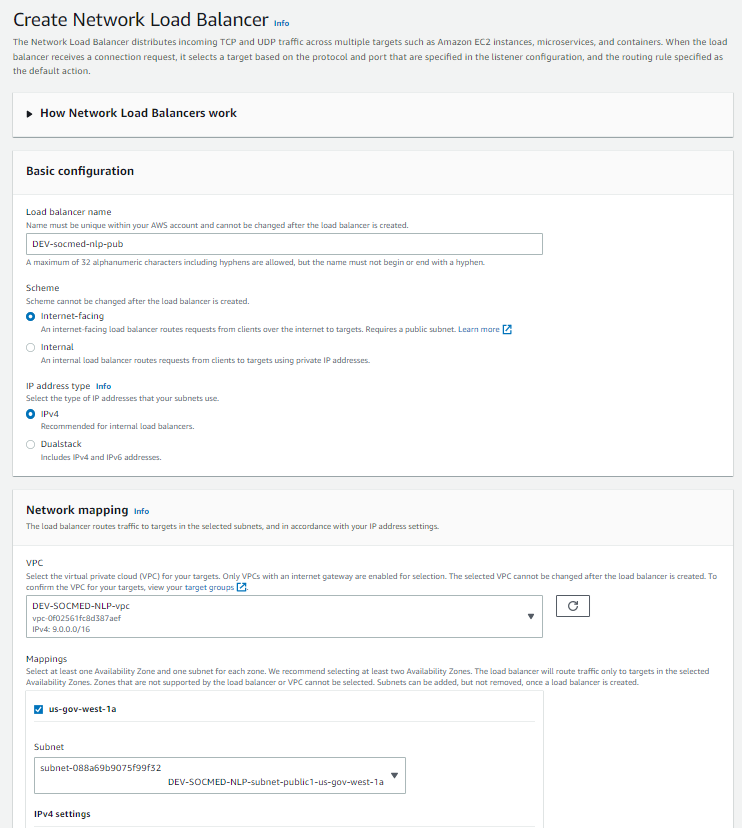
Select your load balancer name, and use the parameters shown. Use two PUBLIC subnets, and create two listener rules using the ALB TG we created earlier:
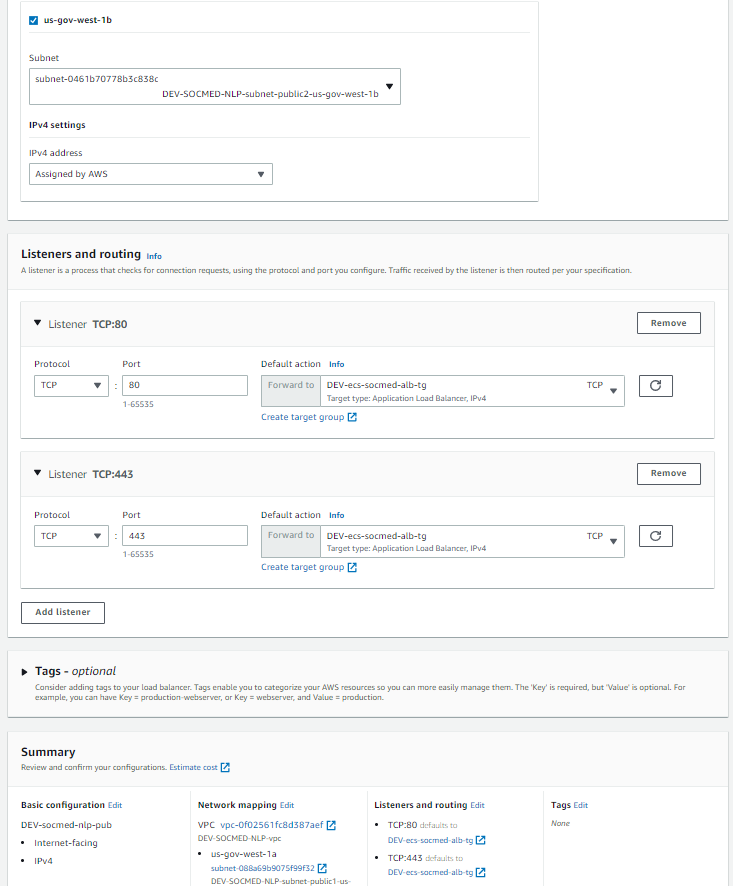
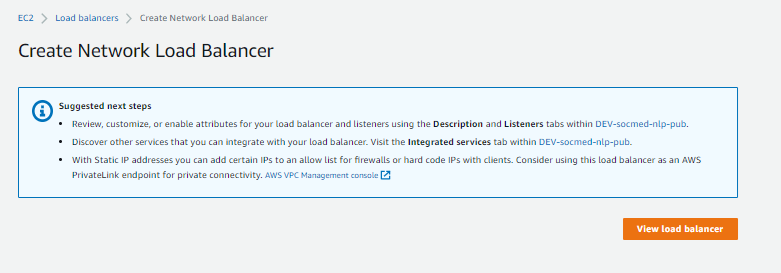
After selecting create Load Balancer, you will be taken to this screen. Please allow 5-10 minutes for NLB creation.
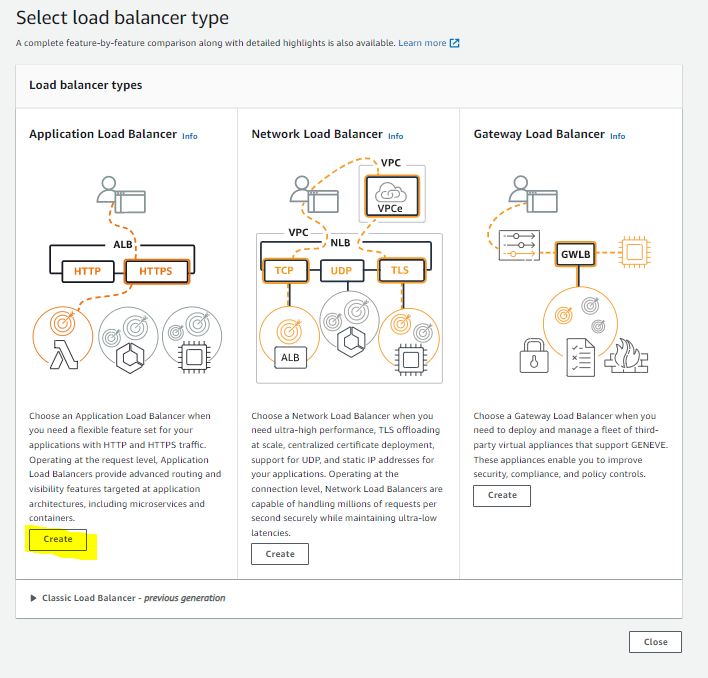
After your NLB provisions, you can create your ALB:

Create your internal ALB using PRIVATE subnets. The listener we are creating will be modified in the future, but is necessary for a placeholder:
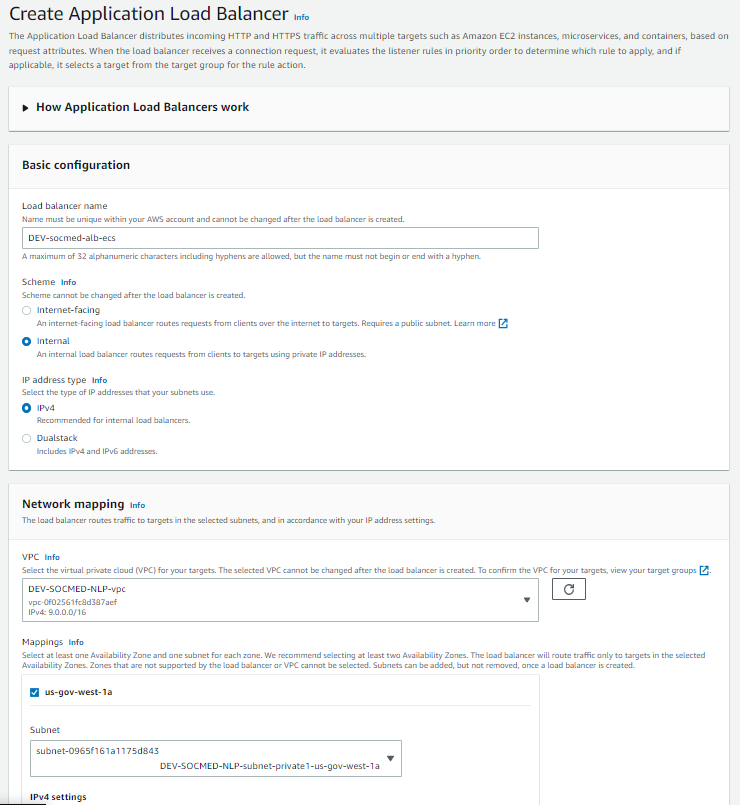
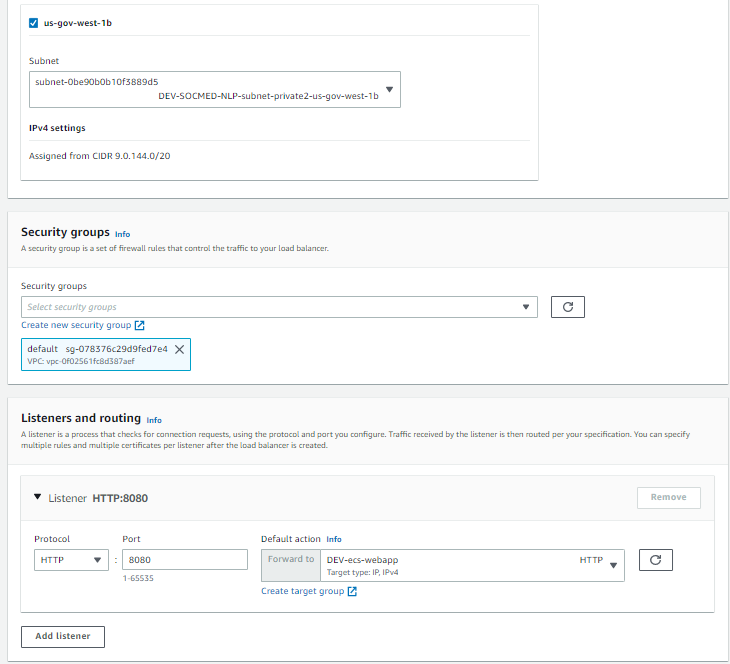
Please allow 5 – 10 minutes for the ALB to provision.
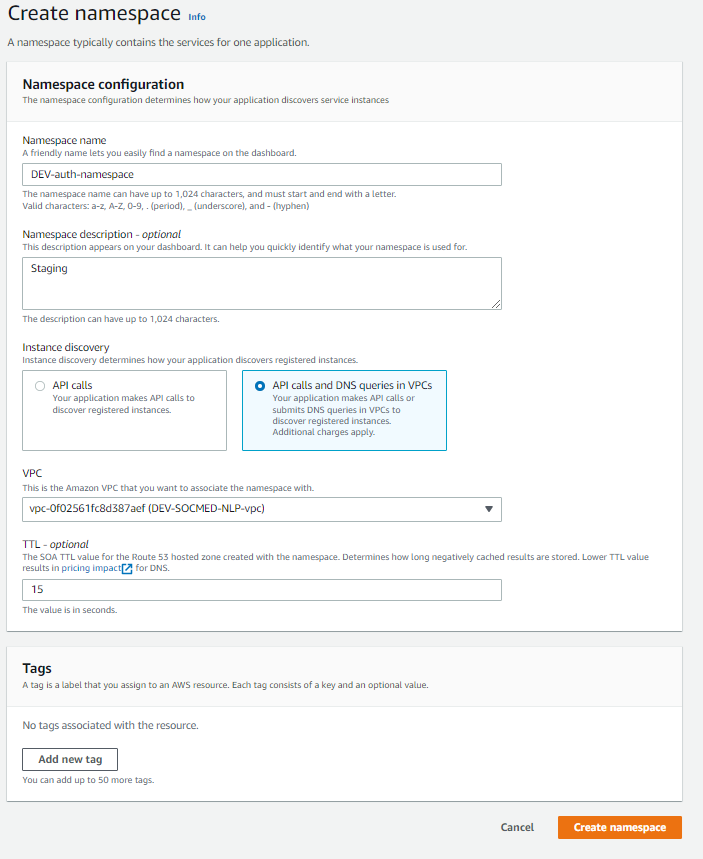
Now we can move on to DNS. Within the Services tab, select Cloud Map. Then create a new namespace:
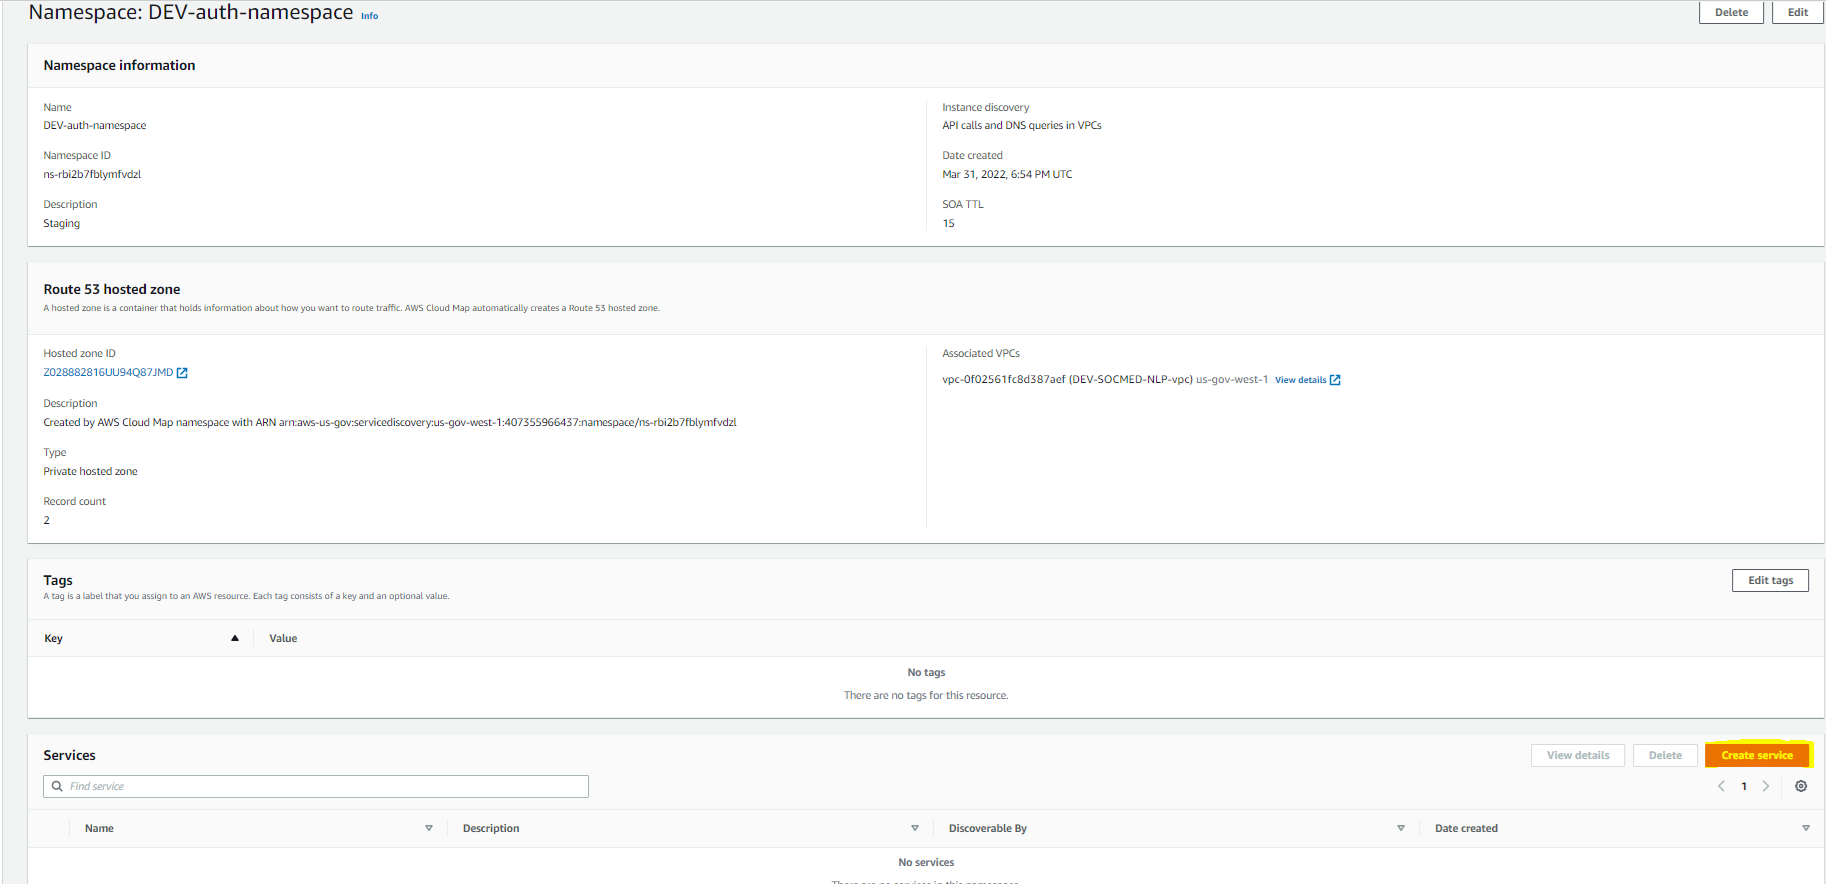
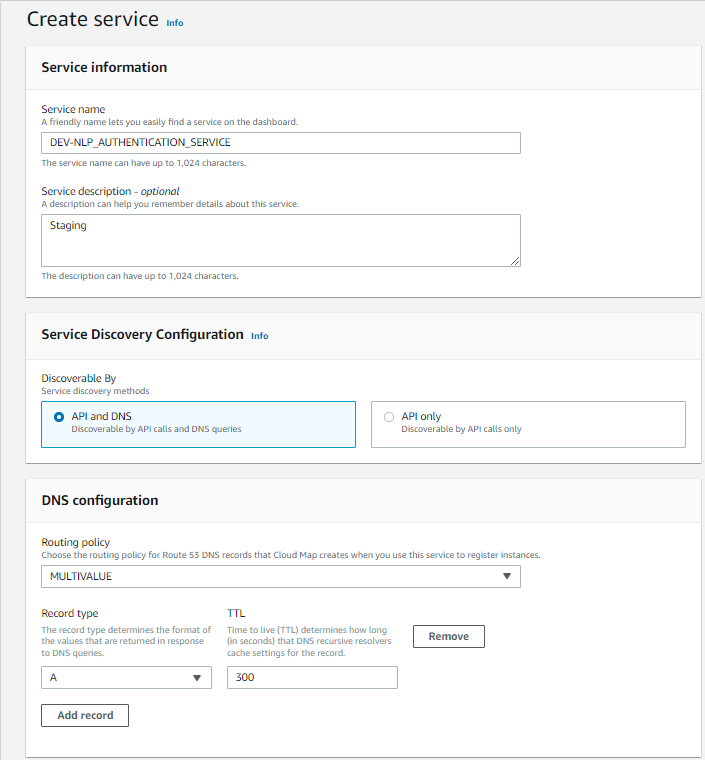
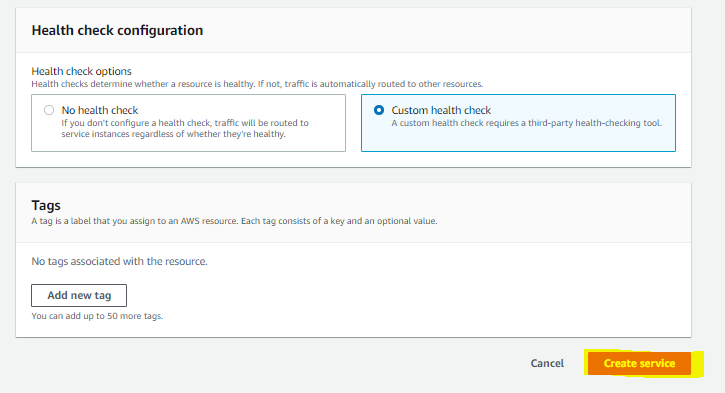
Once your namespace has provisioned, click on it and then Create service:
Within the ELB, add a listener with these settings:
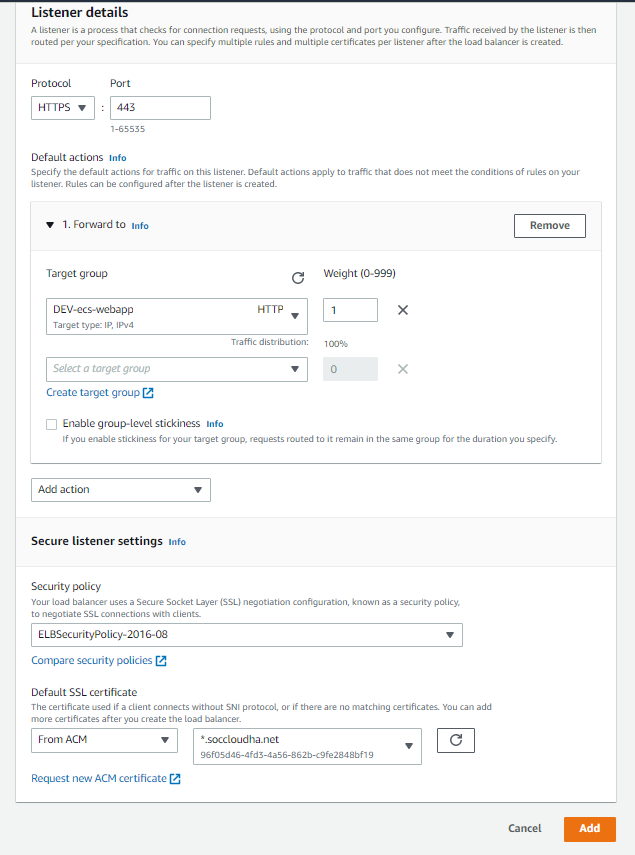
Then add another listener to the ALB with these settings:
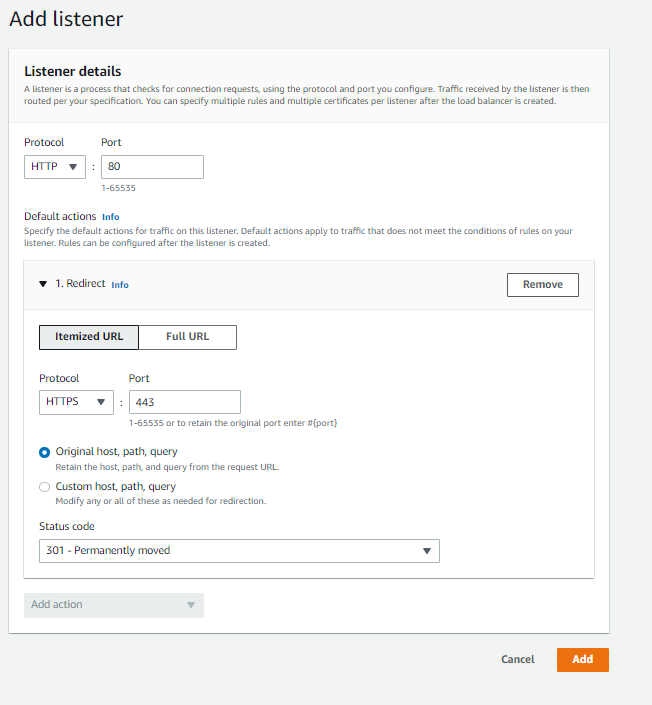
Now, you’ll have to reach out to CCMO (Clay Reiche) to add the domain name we want to DNS.
After that is done, we can add the remaining listeners to the ELB:
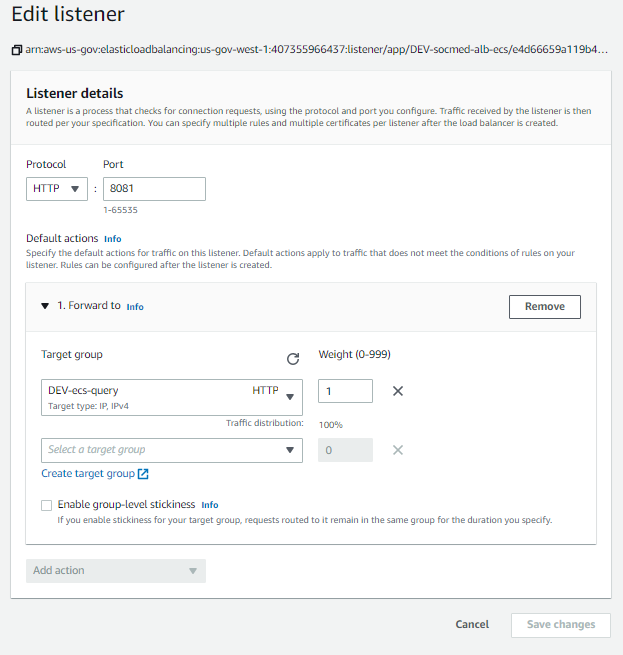
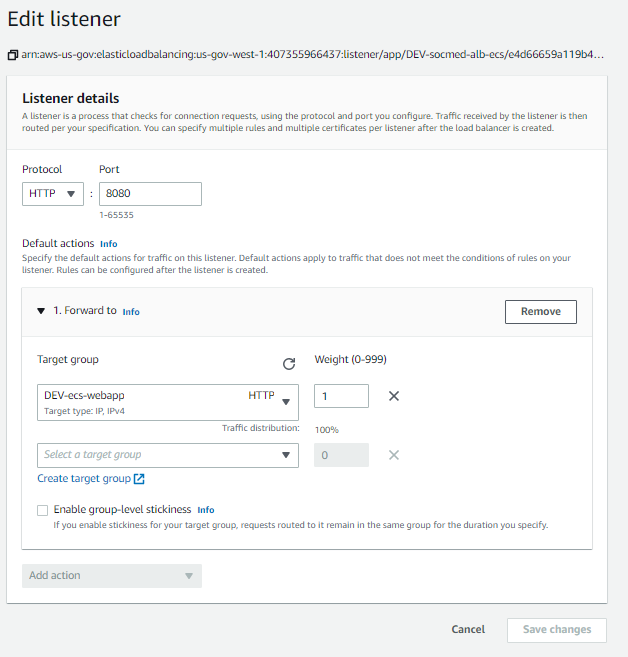
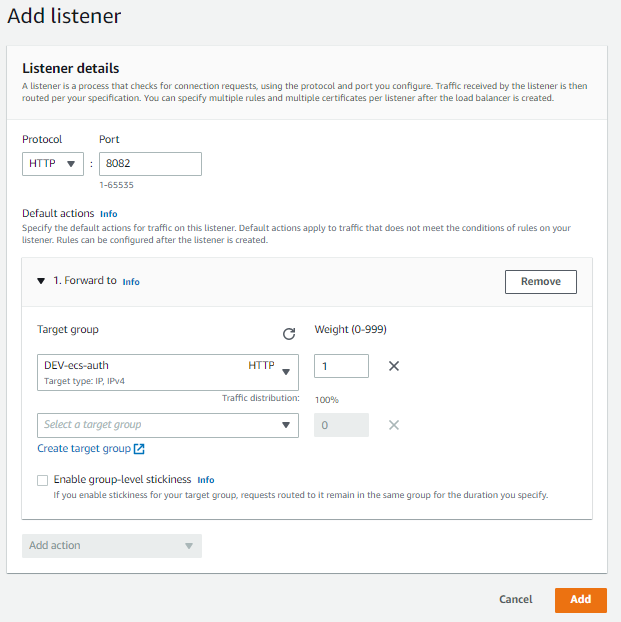
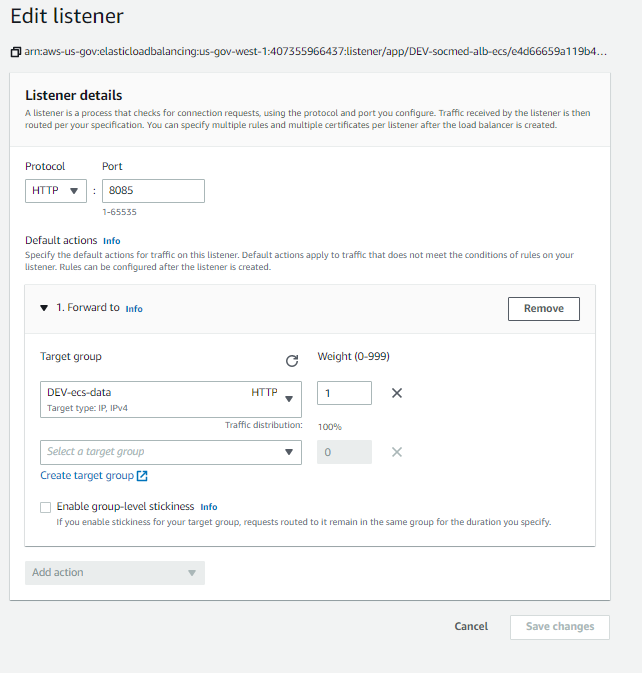
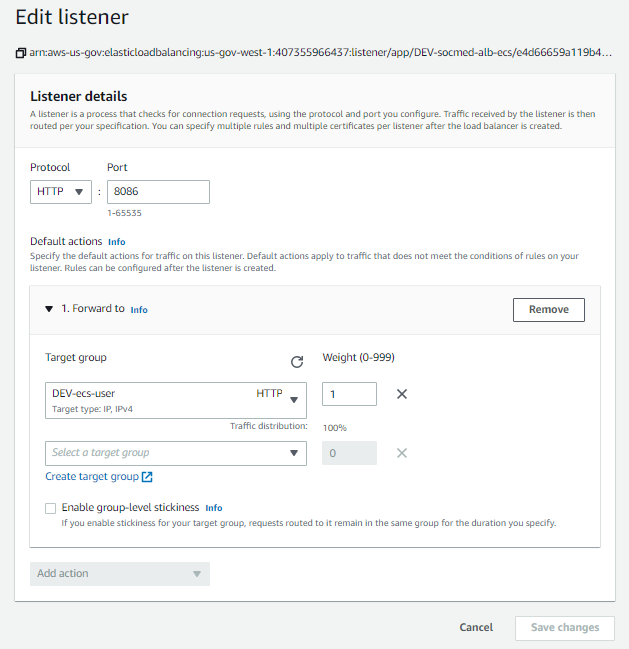
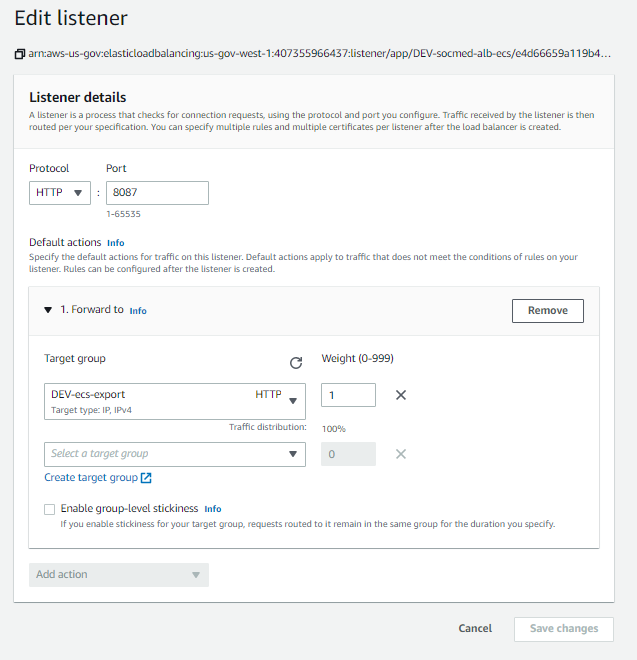
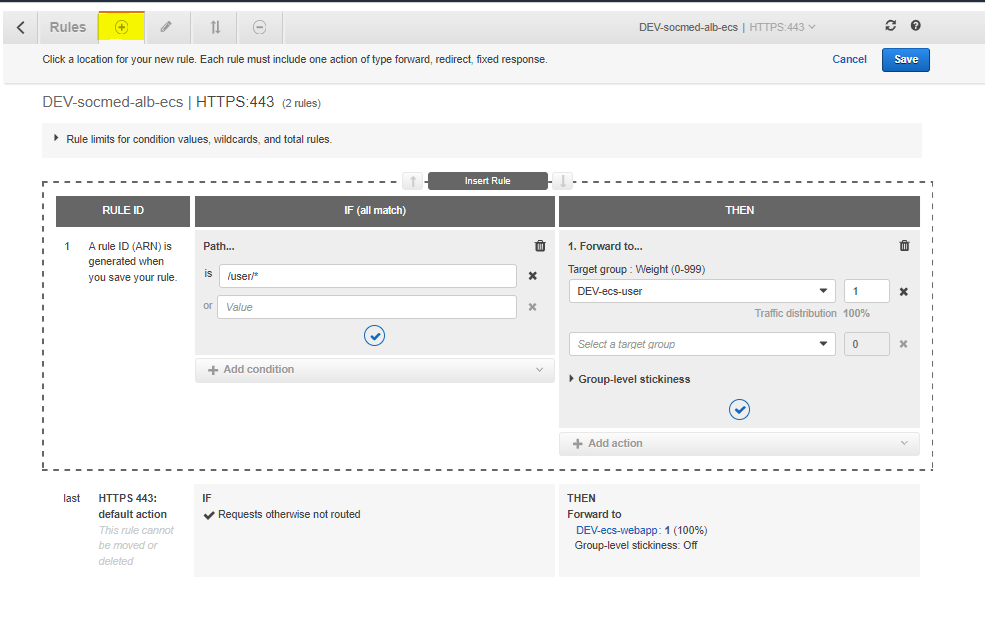
Now, from the Load Balancer menu, on the HTTPS: 443 row, select View/edit rules:

Now, select the + at the top of the page next to rules, then add this rule:
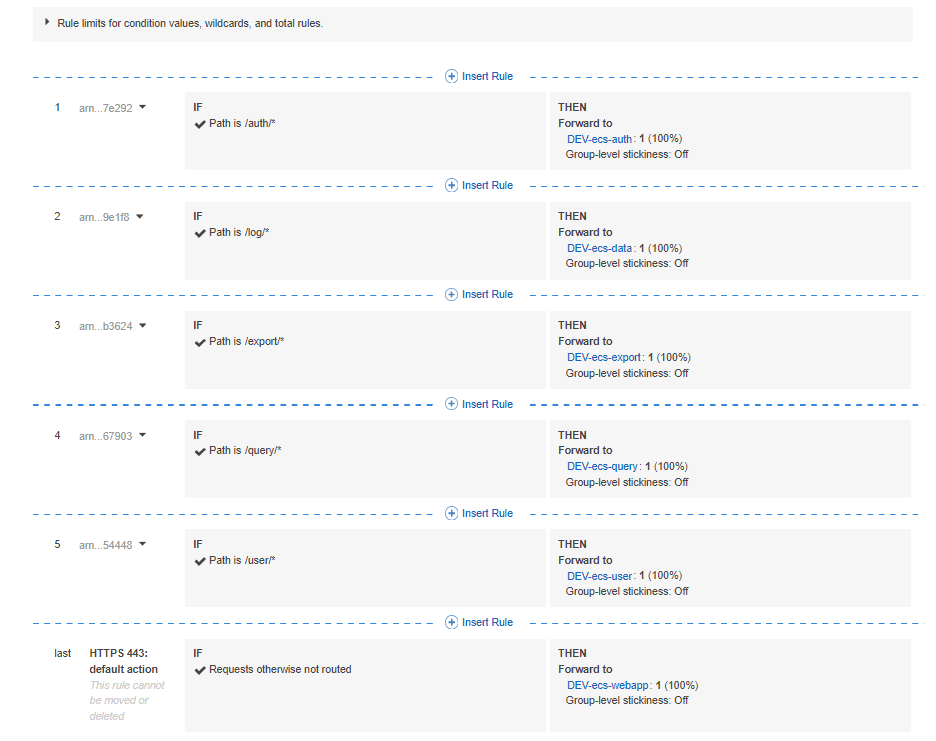
Add the remaining rules:
After this, we can finally add the ALB to the ALB target group we provisioned earlier:
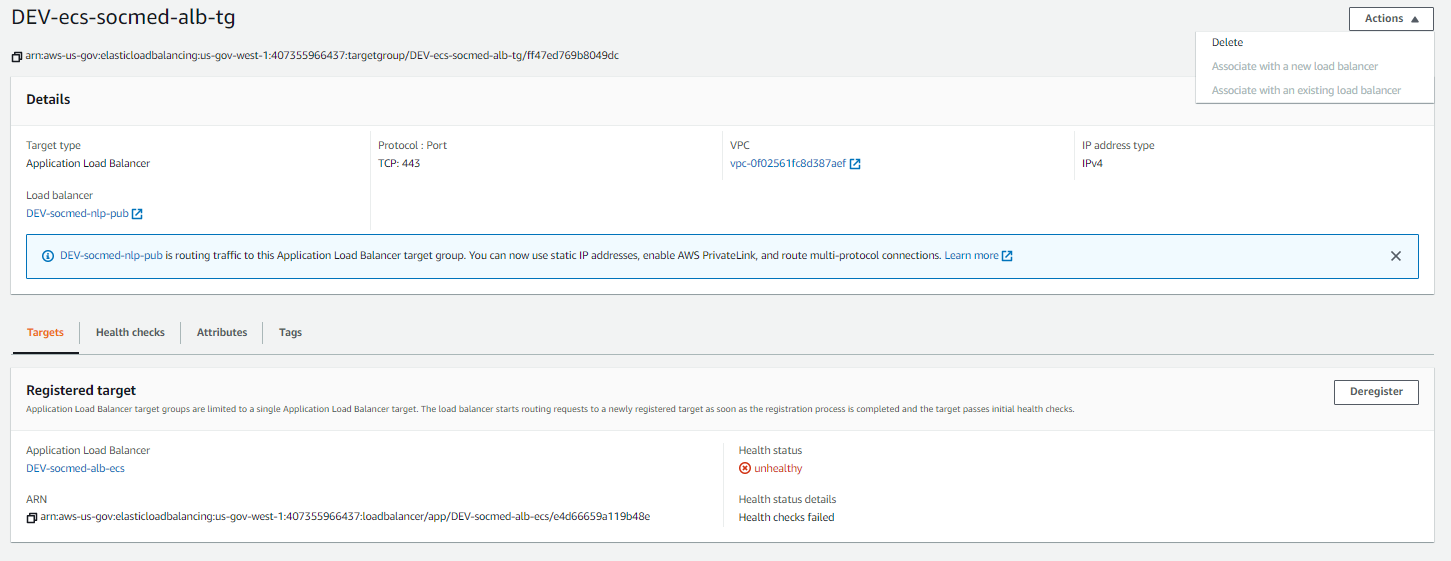
Load Balancer setup complete!
Elastic Container Registry Setup
In the AWS Services tab, navigate to Elastic Container Registry
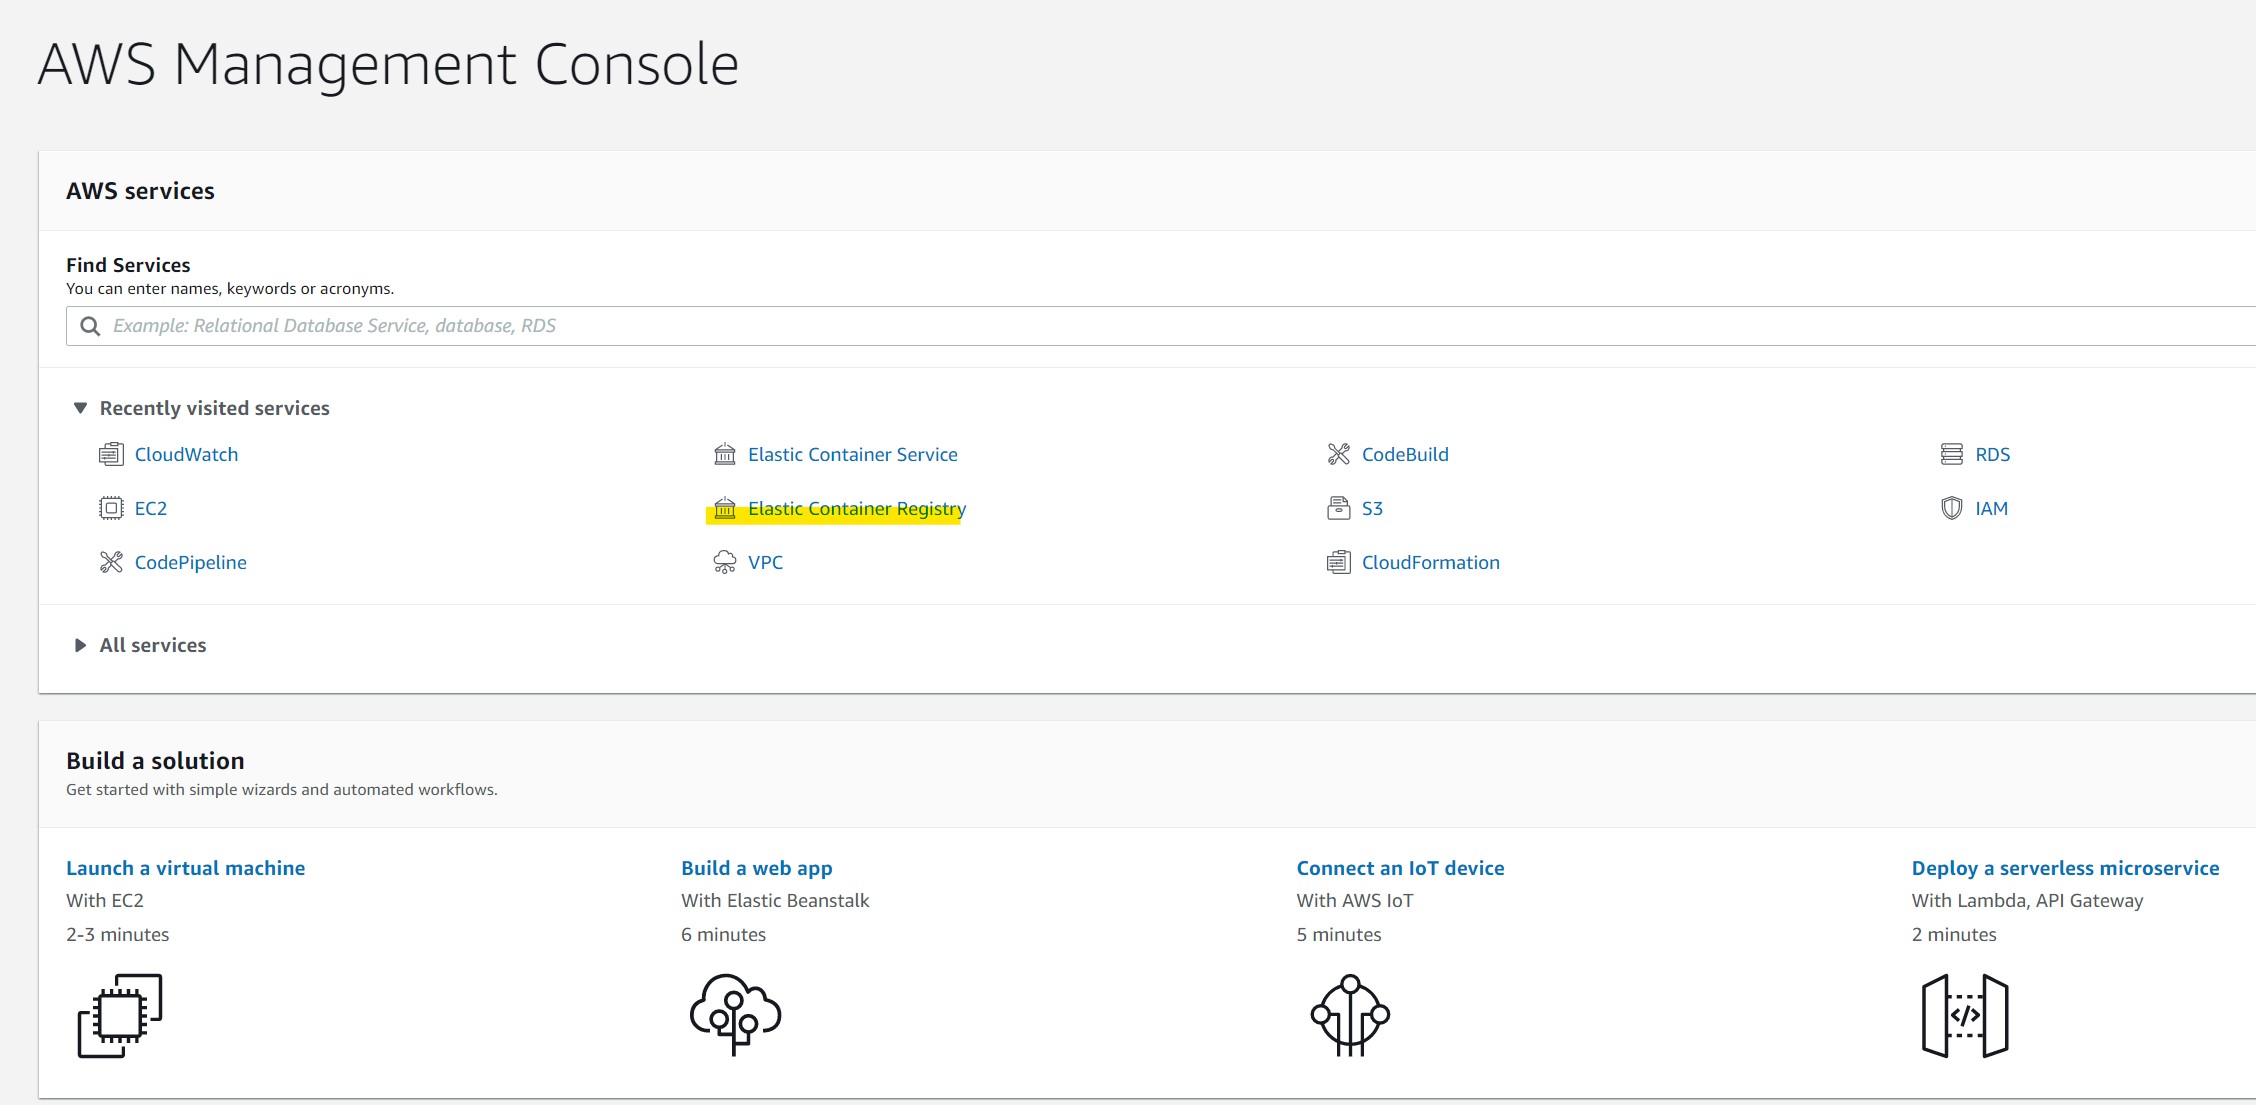
Once here, select the “Create Repository” on the top right

Name your repo and then select the “Create Repository” on the bottom right
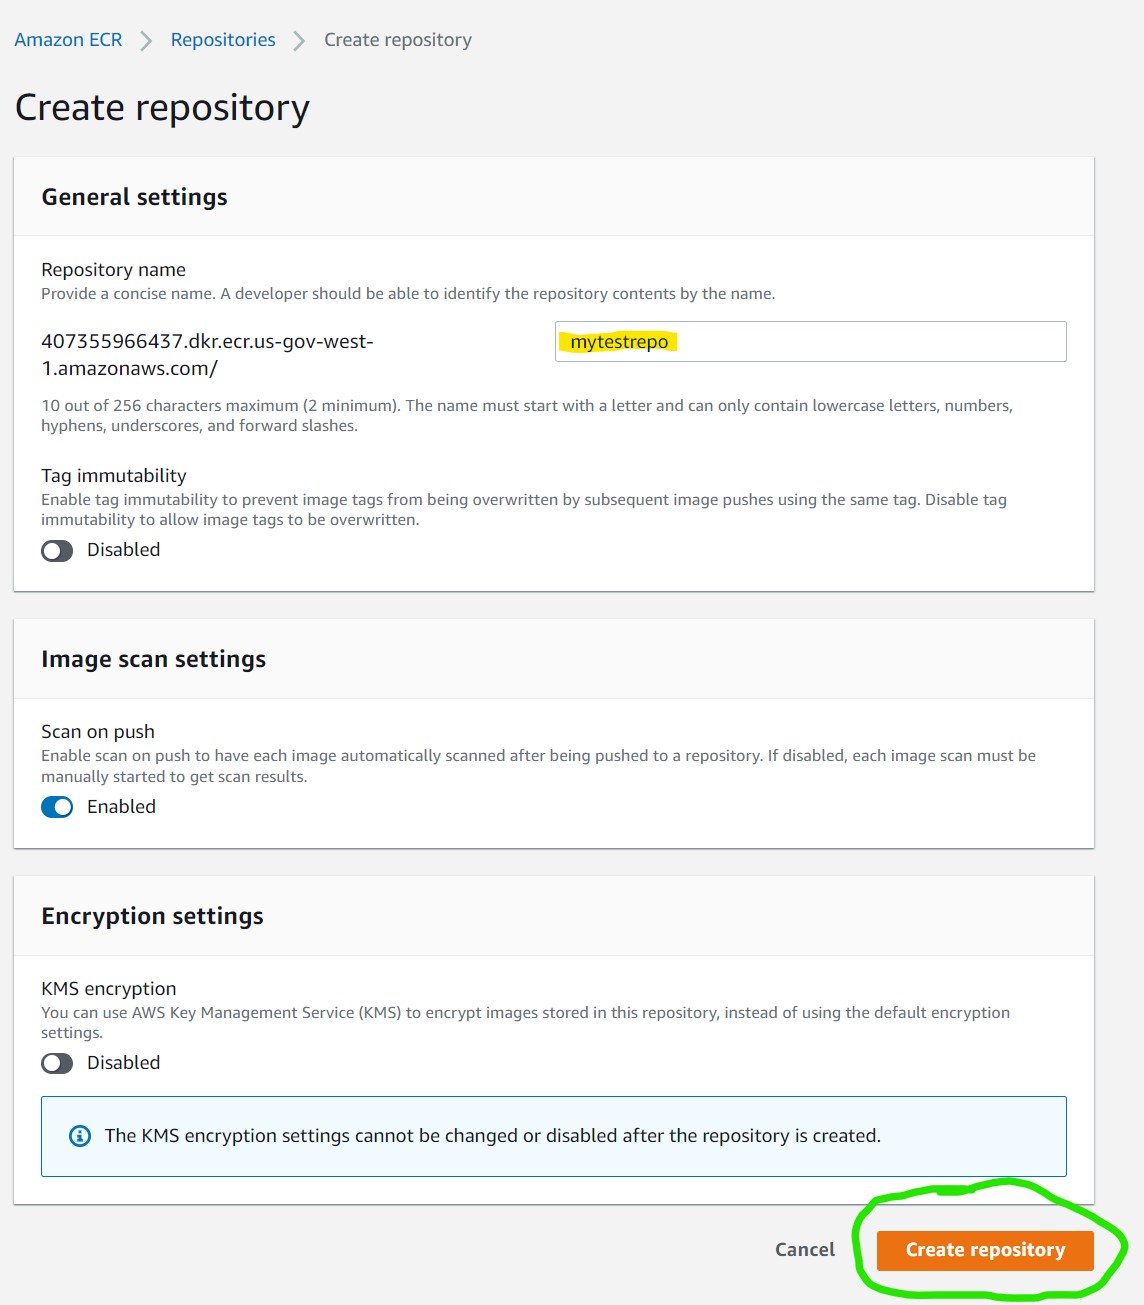
After creation, the new repo will be visible.
- Repository Name will be a link to details about the image repo
- The URI contains the location to push/pull from

ℹ️ Click the repo name under the “Repository Name” column to add container aws_ecs to repo
There will be an empty repo with no container aws_ecs listed
To add aws_ecs click the “View Push Commands” in the top right

This will show 4 steps
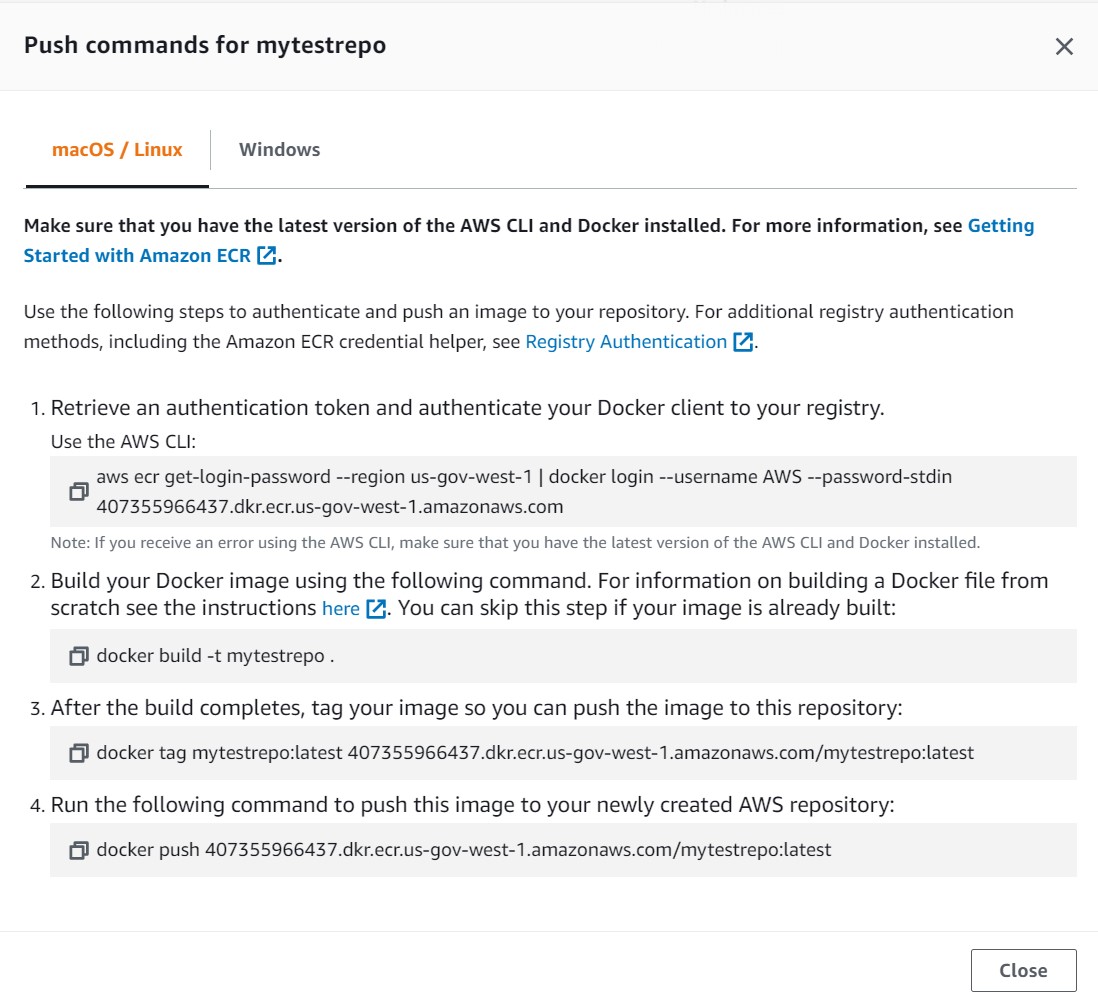
aws ecr get-login-password --region us-gov-west-1 | docker login --username AWS --password-stdin 407355966437.dkr.ecr.us-gov-west-1.amazonaws.com
docker build -t mytestrepo .
docker tag mytestrepo:latest 407355966437.dkr.ecr.us-gov-west-1.amazonaws.com/mytestrepo:latest
docker push 407355966437.dkr.ecr.us-gov-west-1.amazonaws.com/mytestrepo:latest
Once pushed, you will see container aws_ecs in the repository

Elastic Container Service Setup
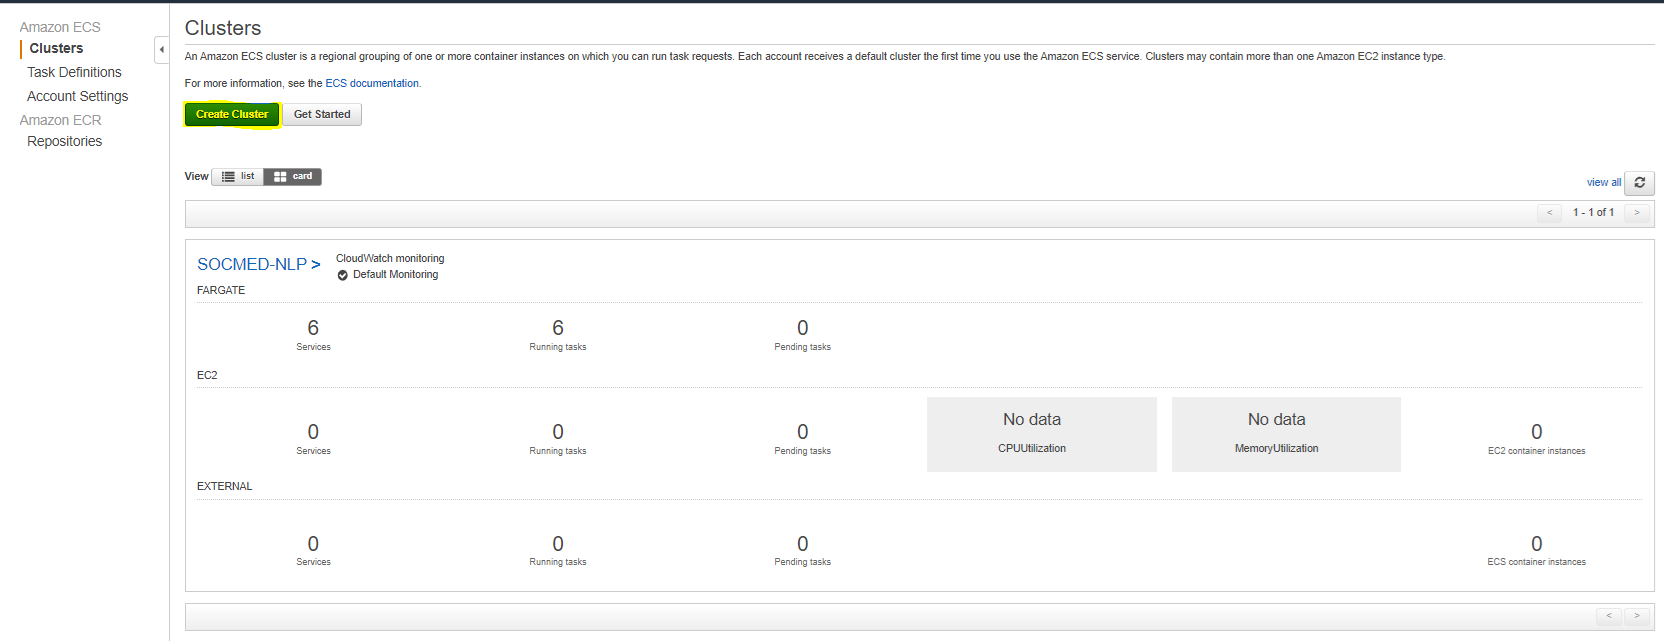
In the AWS Services tab, navigate to Elastic Container Service, and then select Create Cluster:
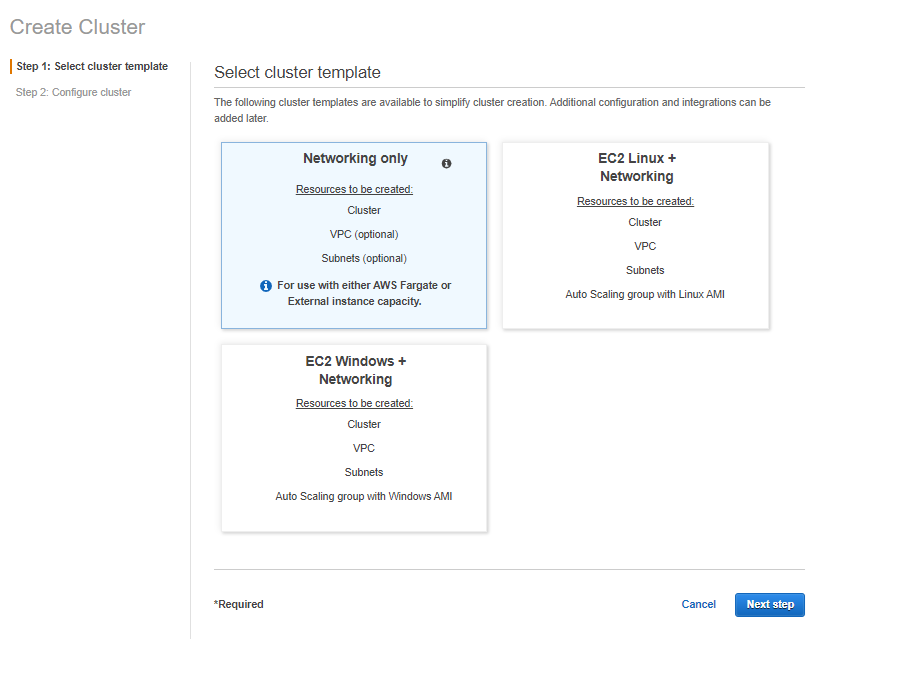
Select Networking only so we can leverage AWS FarGate (serverless nodes):
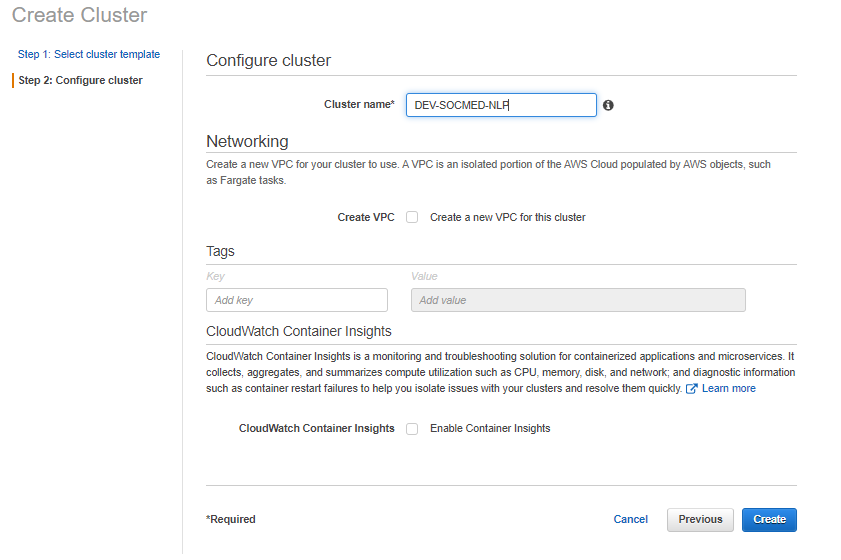

Before we create a task def, we need to get our env vars in place. Open S3, and add a file named something like env_var_dev.env. The contents will look something like this:
FLASK_ENV="docker"
FLASK_APP=app.py
PYTHONDONTWRITEBYTECODE=1
ENV_DATABASE_HOST=dev-1.cv34trxukfu4.us-gov-west-1.rds.amazonaws.com
ENV_DATABASE_NAME=postgres-dev
ENV_DATABASE_USERNAME=SUPERCOOLUSERNAME
ENV_DATABASE_PASSWORD=XXXXXXXXXXXXXXXXXXXX
ENV_DATABASE_PORT=5432
ENV_SECRET_KEY=XXXXXXXXXXXXXXXXXXXXXXXXXXXXX
ENV_REGISTRATION_TOKEN=XXXXXXXXXXXXXXXXXXXXXXXXXXXXX
ENV_AUTH_SERVICE_URL=https://dev-socmed-nlp.soccloudha.net
ENV_BASE_URL=https://dev-socmed-nlp.soccloudha.net
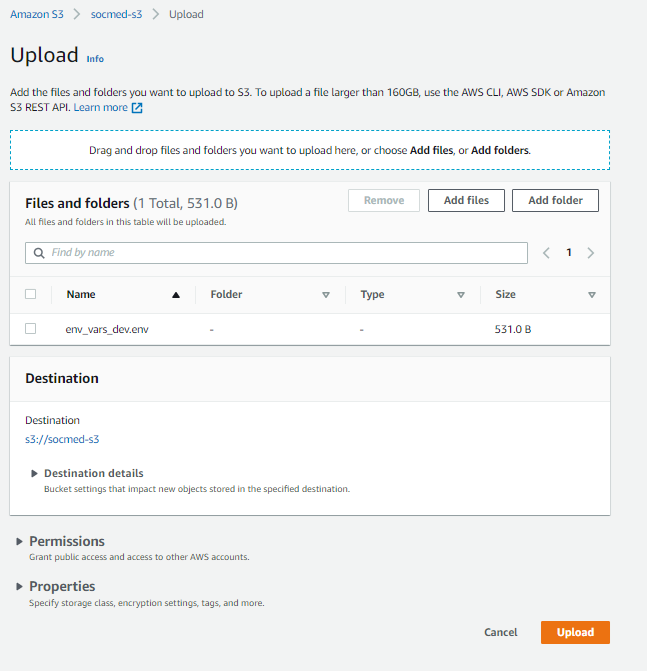
Now go back to ECS in the AWS console, then Select Task Definitions on the left column. Now create a new Task Definition:

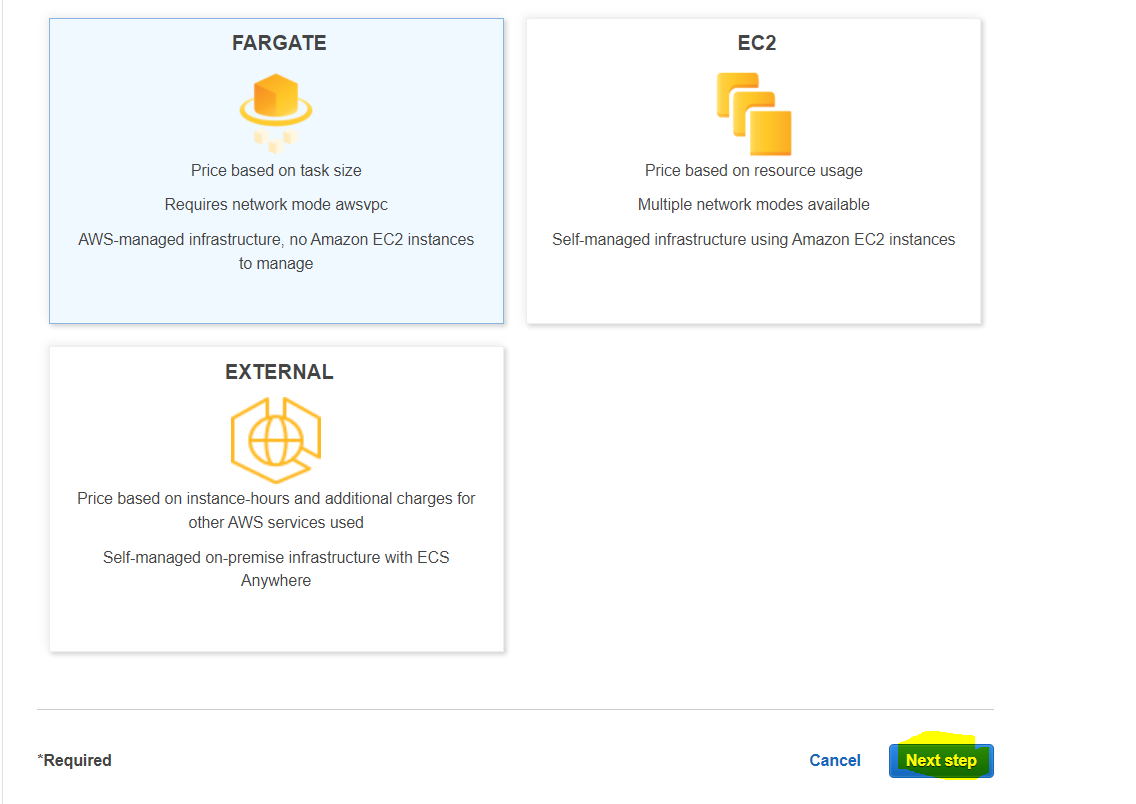
Ensure FarGate is selected, then hit next:
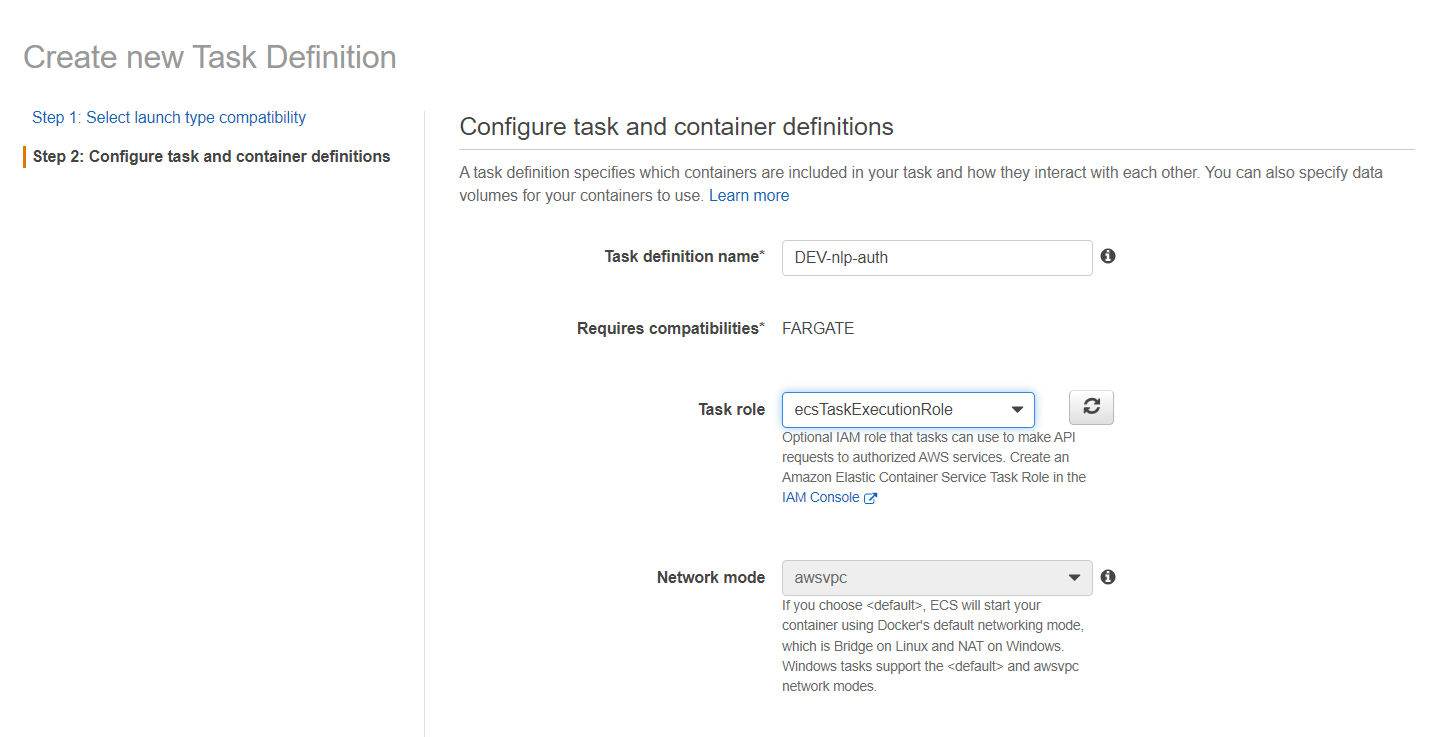
Name your task def, and ensure it has the ecsTaskExecutionRole attached:
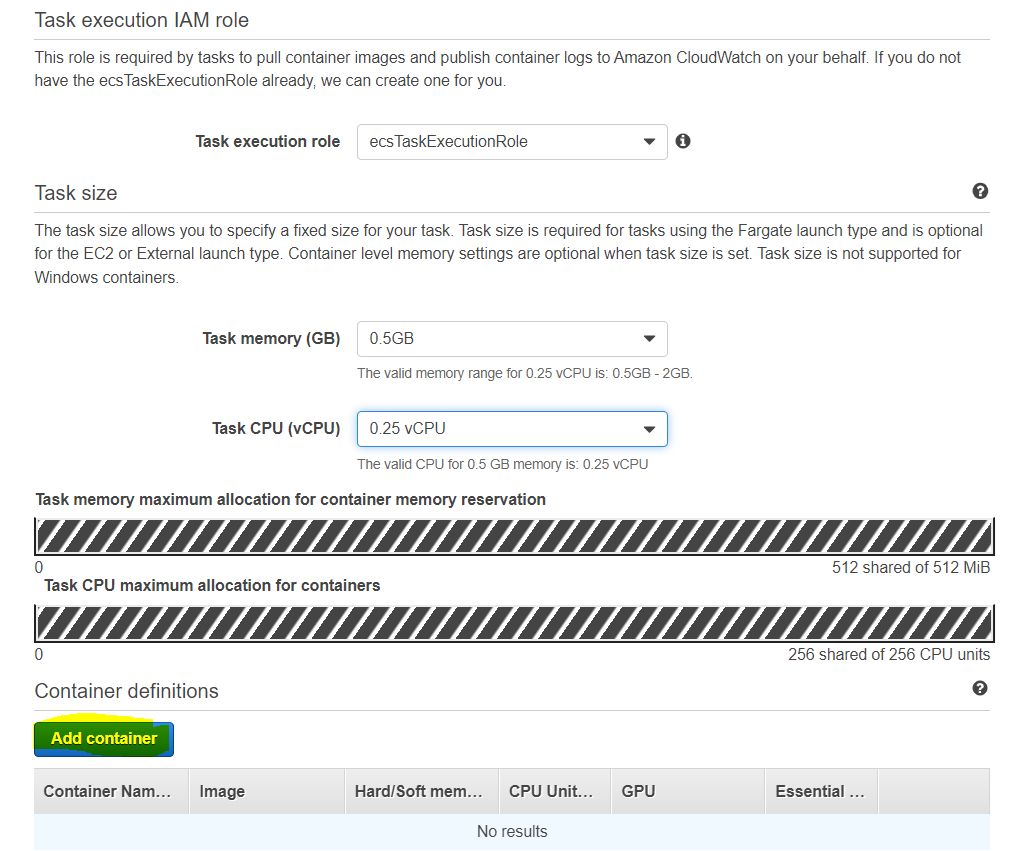
Populate the Task execution IAM role and Task size sections, then select Add container:
In a new tab, open ECR, then copy the URI for the container:

On the previous tab, you can now populate the Image section, as well as the rest of the info required. Be sure to include the dev tag, and proper container name.
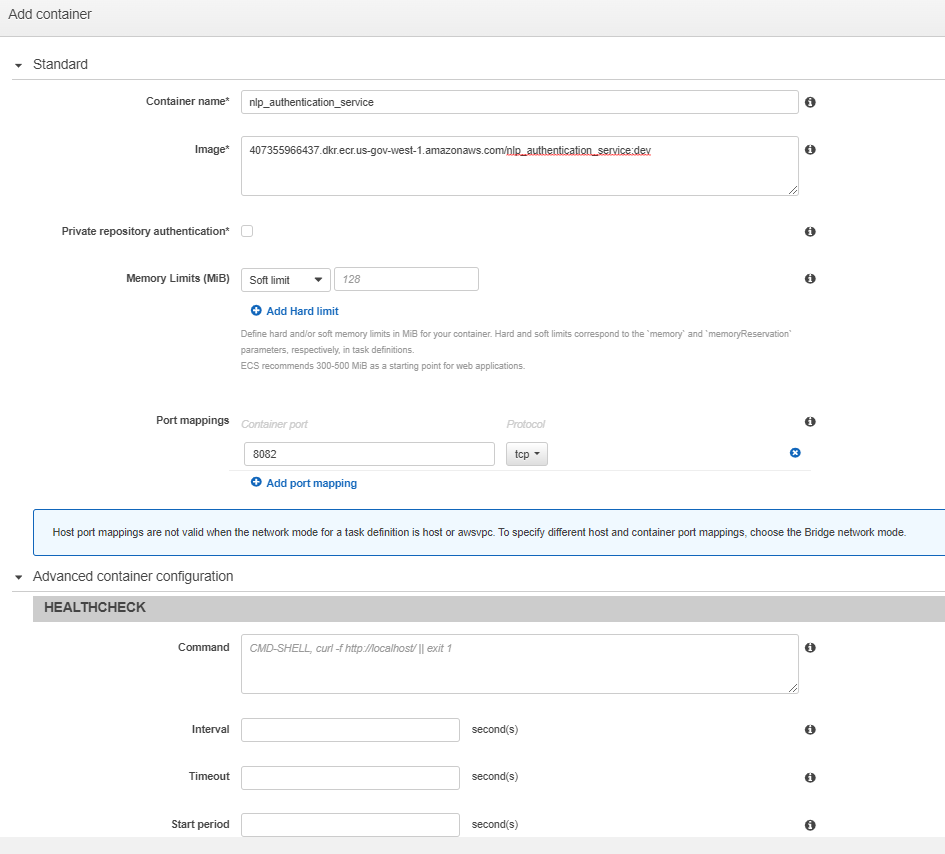
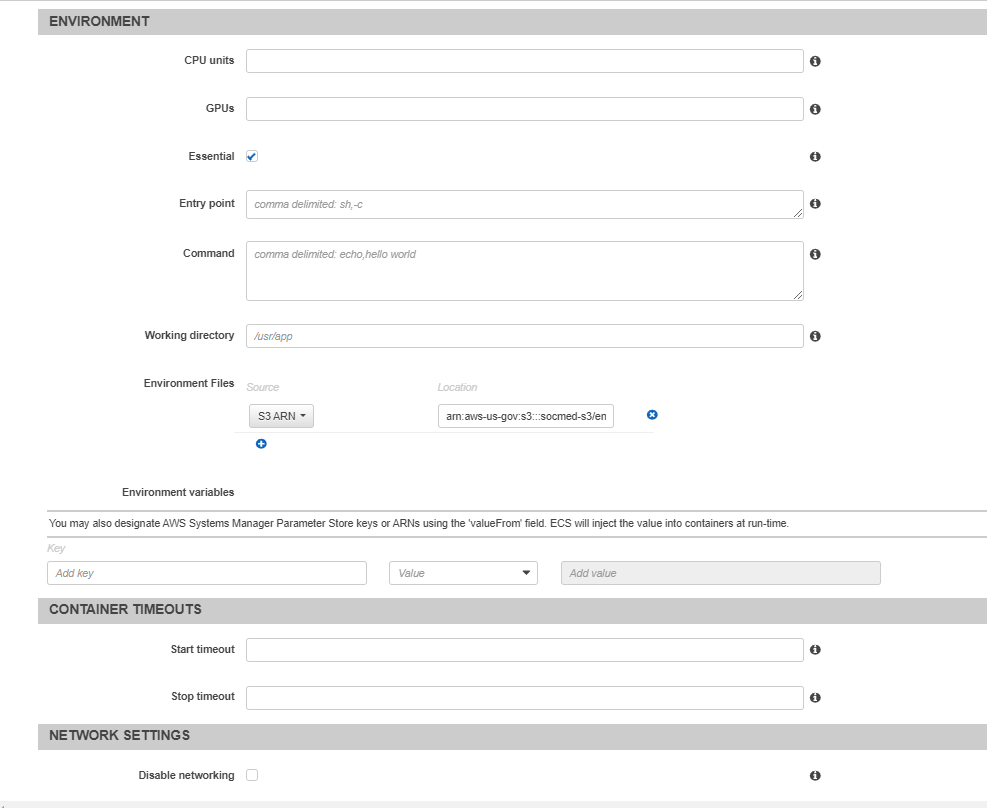
The rest of the options will be left default. Ensure you add the env_vars_dev.env file to Environment Files, and that the port mapping matches what is in the load balancer Once you’ve finished the first container, it will appear in Container definitions. You can now create the task definition. Repeat this process for all other containers. After this is complete, we can now create the services from the task defs. Select your cluster from ECS, then under the services tab, select Create service:
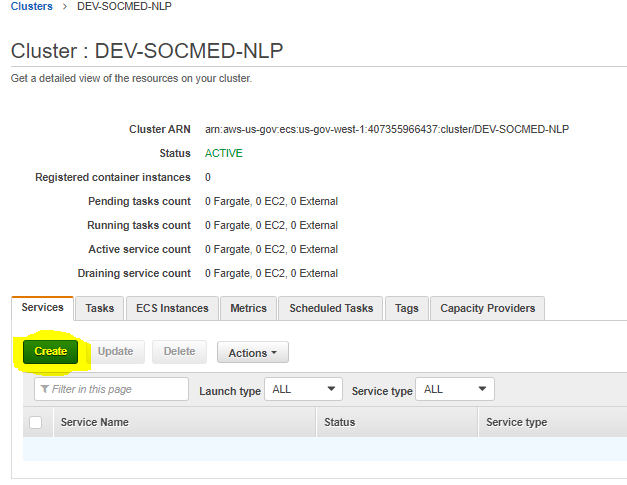
Create your service using the following options, then select Next step:
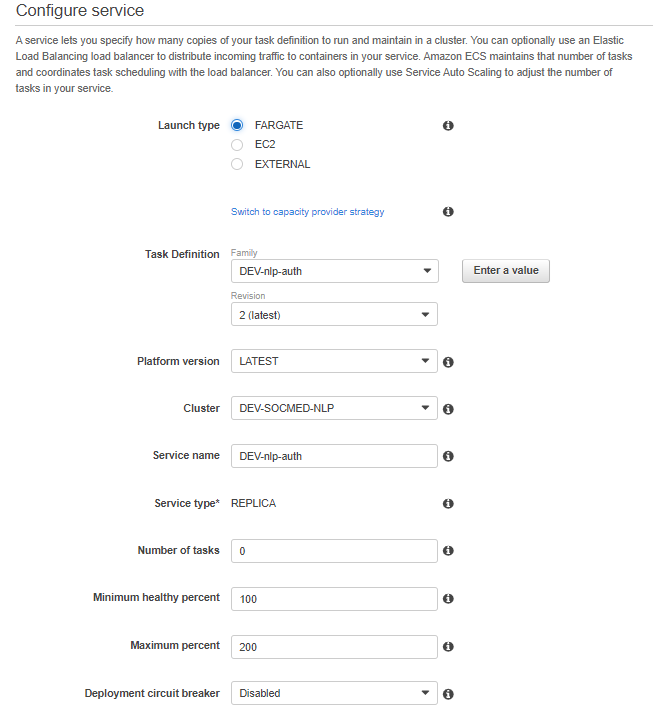
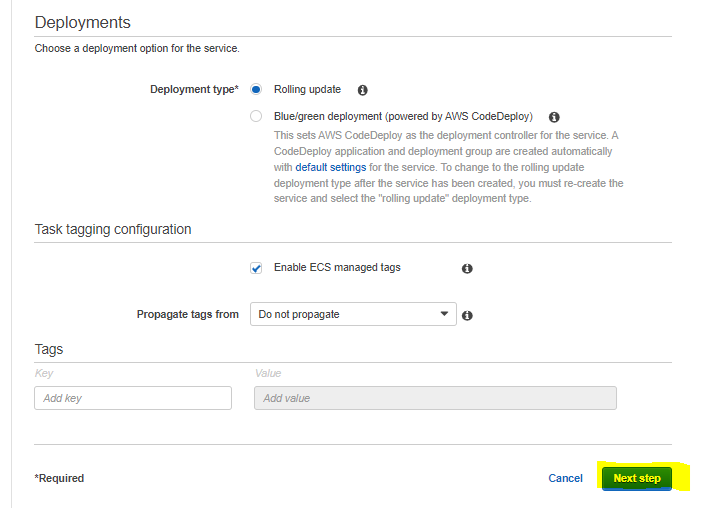
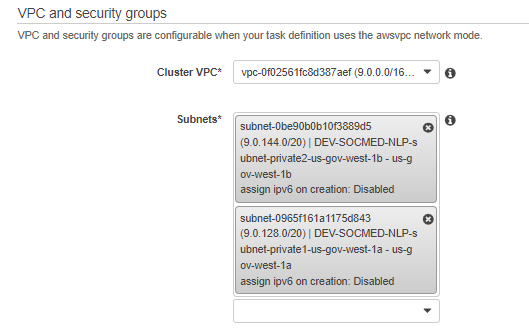
Select your VPC and PRIVATE subnets:
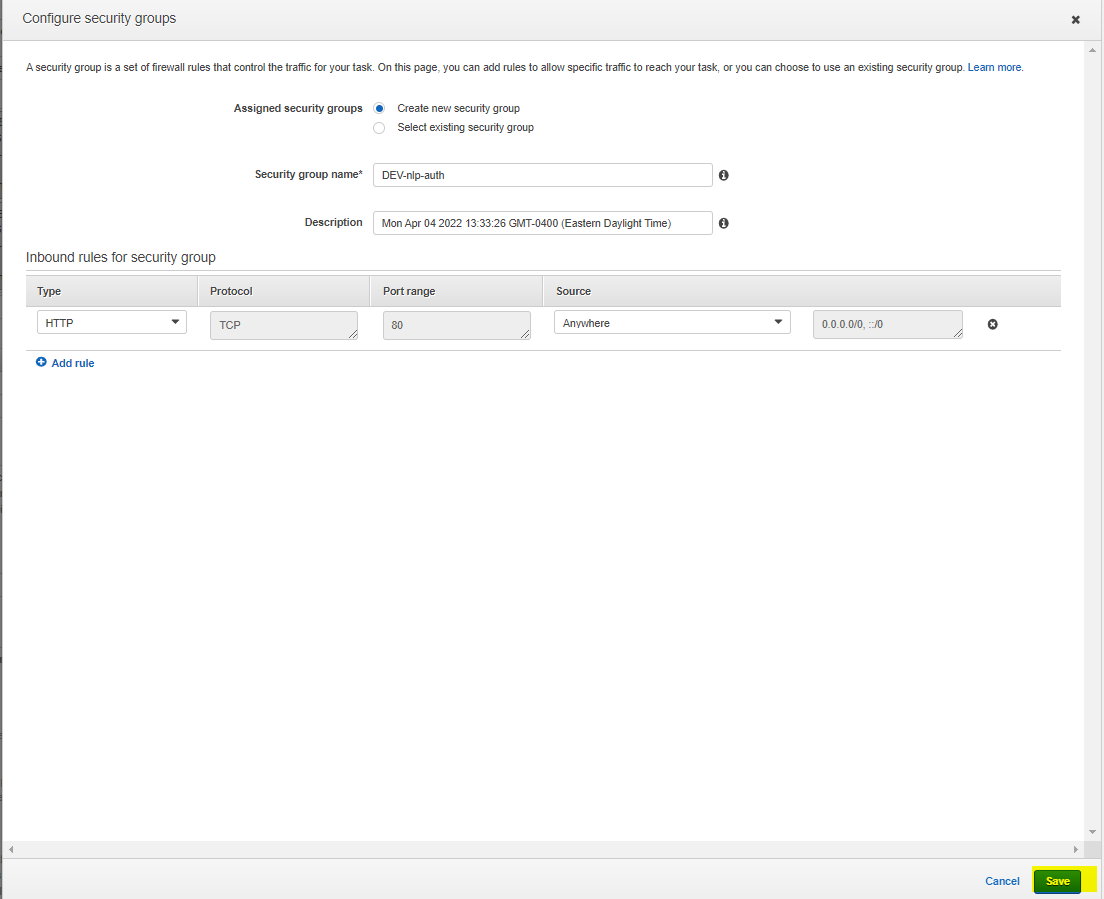
Now, edit the security group. Create a new security group, and name it something like DEV-nlp-auth. We will modify the rules later on:
Under Load balancing, select ALB, then choose the loadbalancer we provisioned earlier, as well as the target group we made earlier:
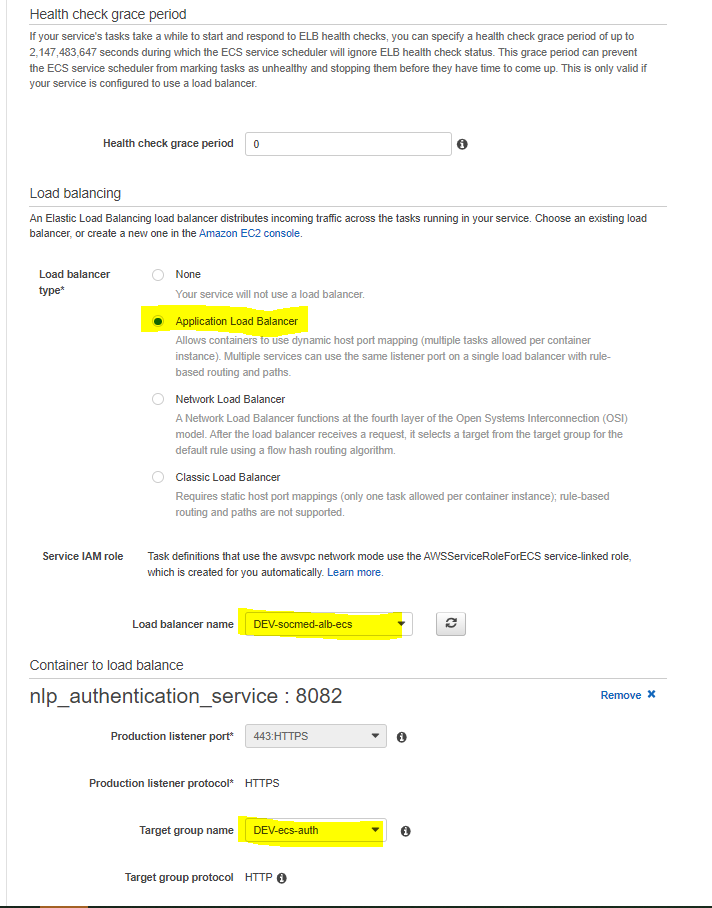
The rest of the information will autopopulate, so select Next step. We will configure auto scaling later on as well, so select Next step again. At the review page, verify all of the information is correct, and then Create service:
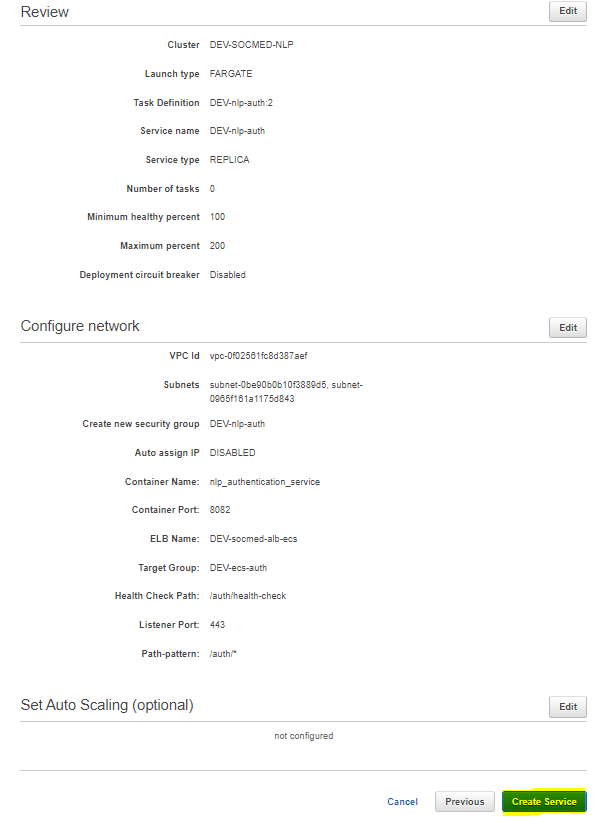
Follow these same steps for the rest of the services, noting the port, service name, private subnets, and target group sections. Be sure to name the security group it creates in order to keep things organized.
AWS Code Builder
Create a Code Pipeline
ℹ️ Creating a pipeline ensures when a new container image is pushed to ECR a new Task (container) will be deployed
In the AWS Services tab, navigate to Code Pipeline
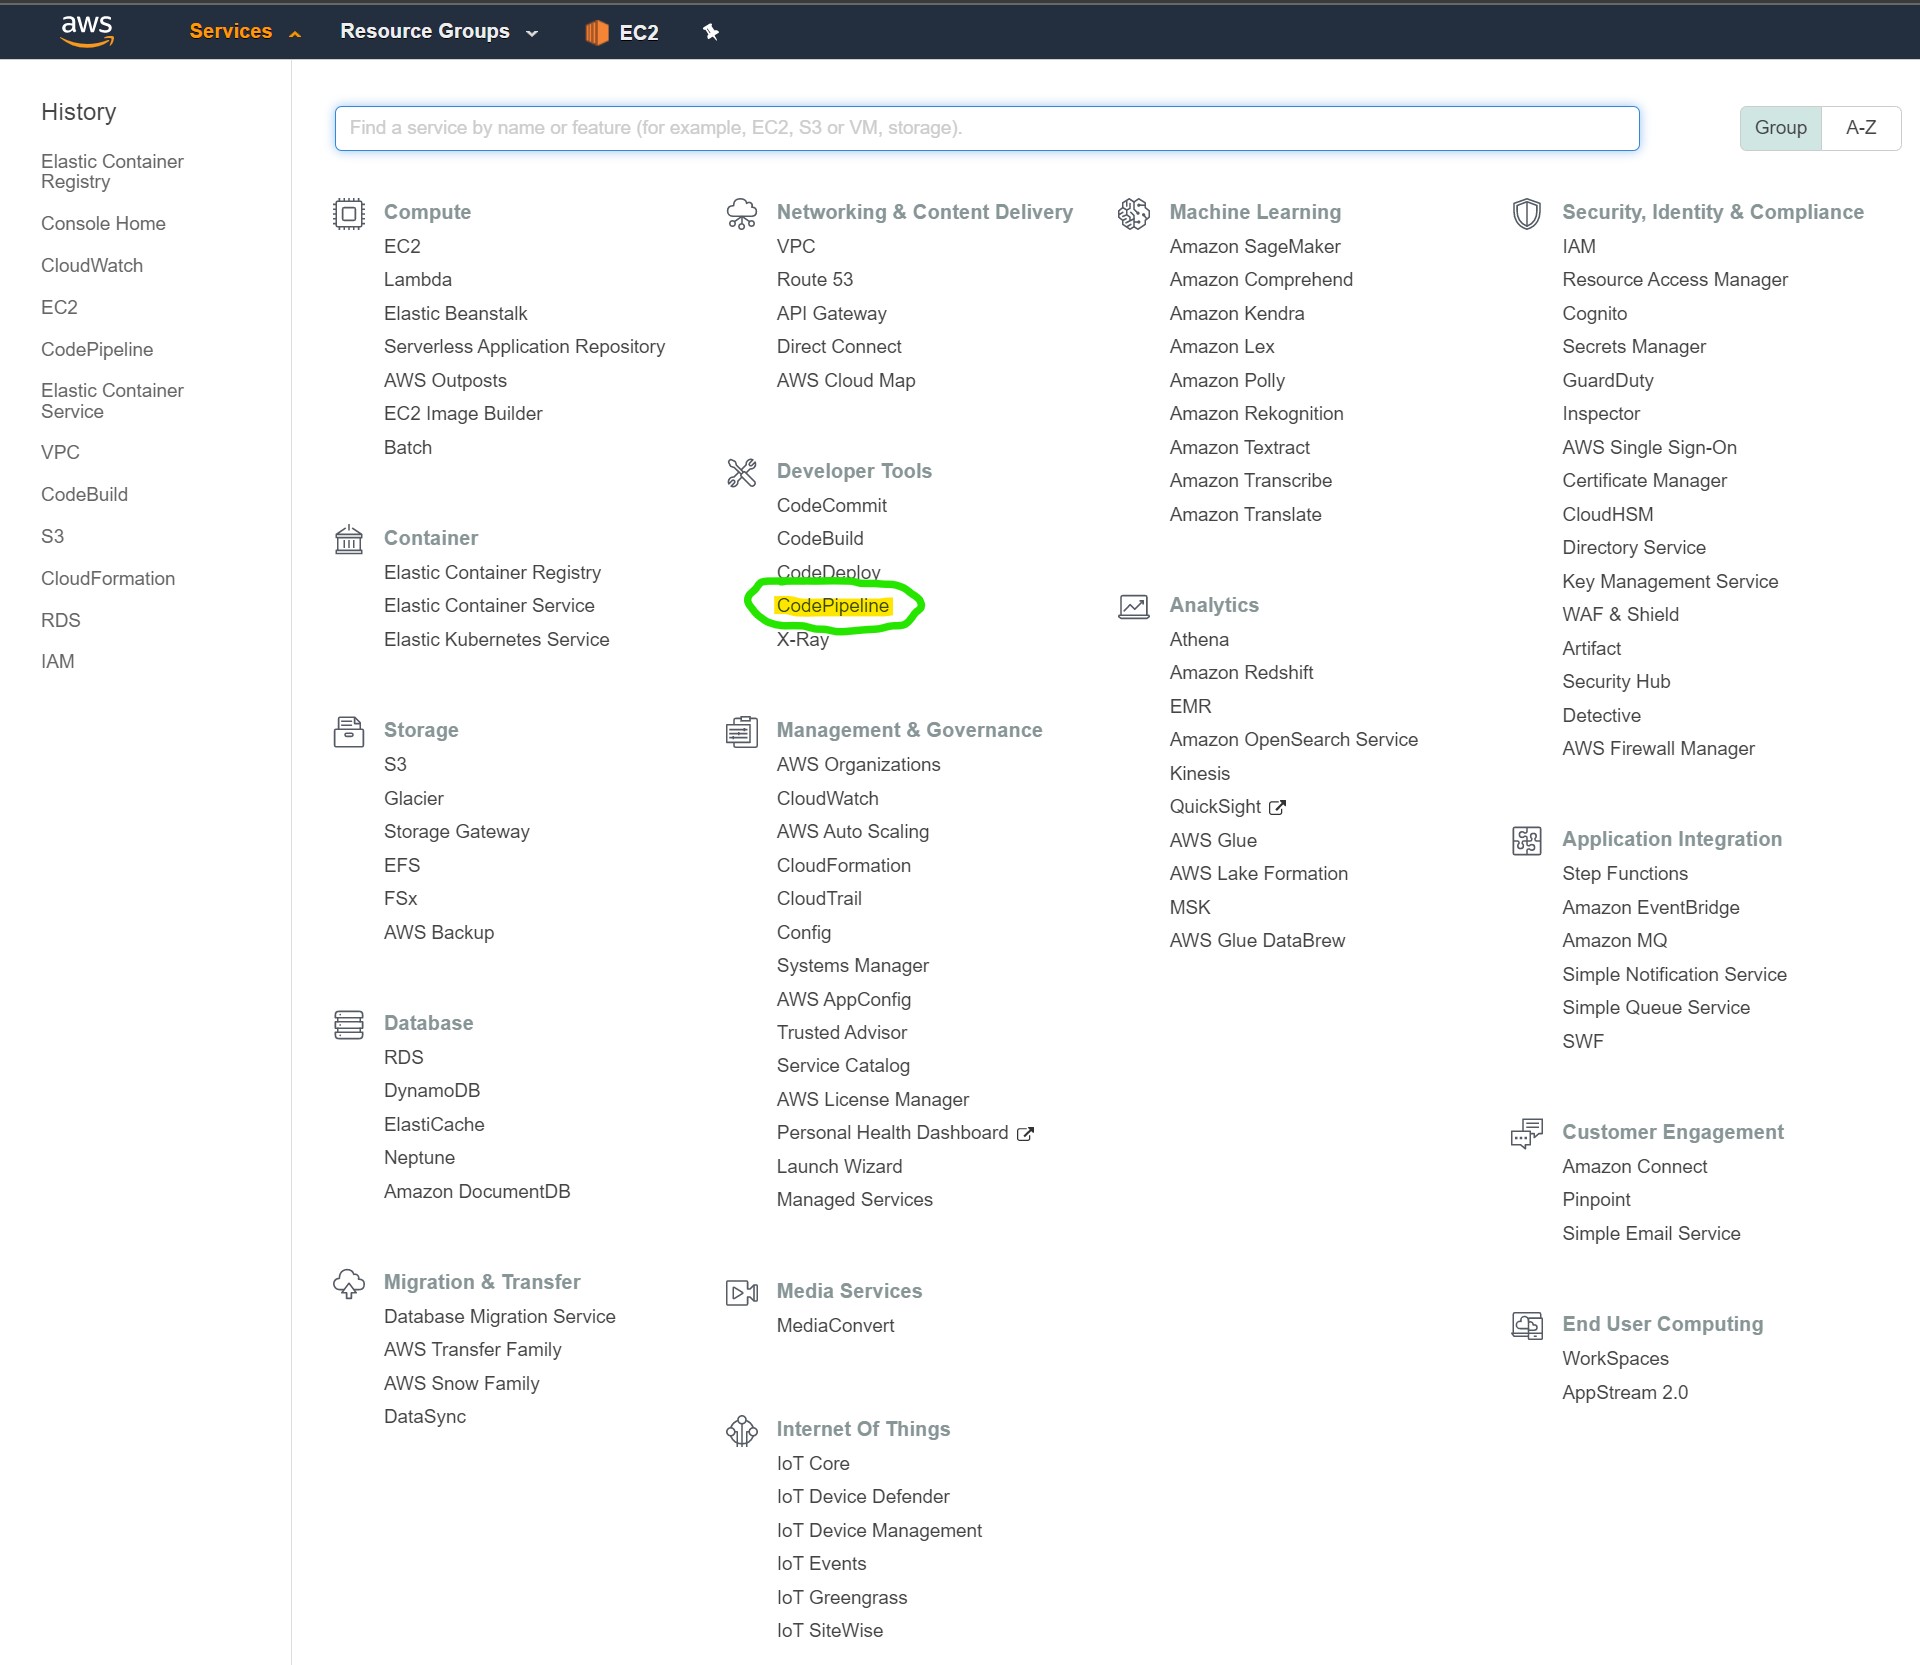
Once here, select the “Create Pipeline” on the top right

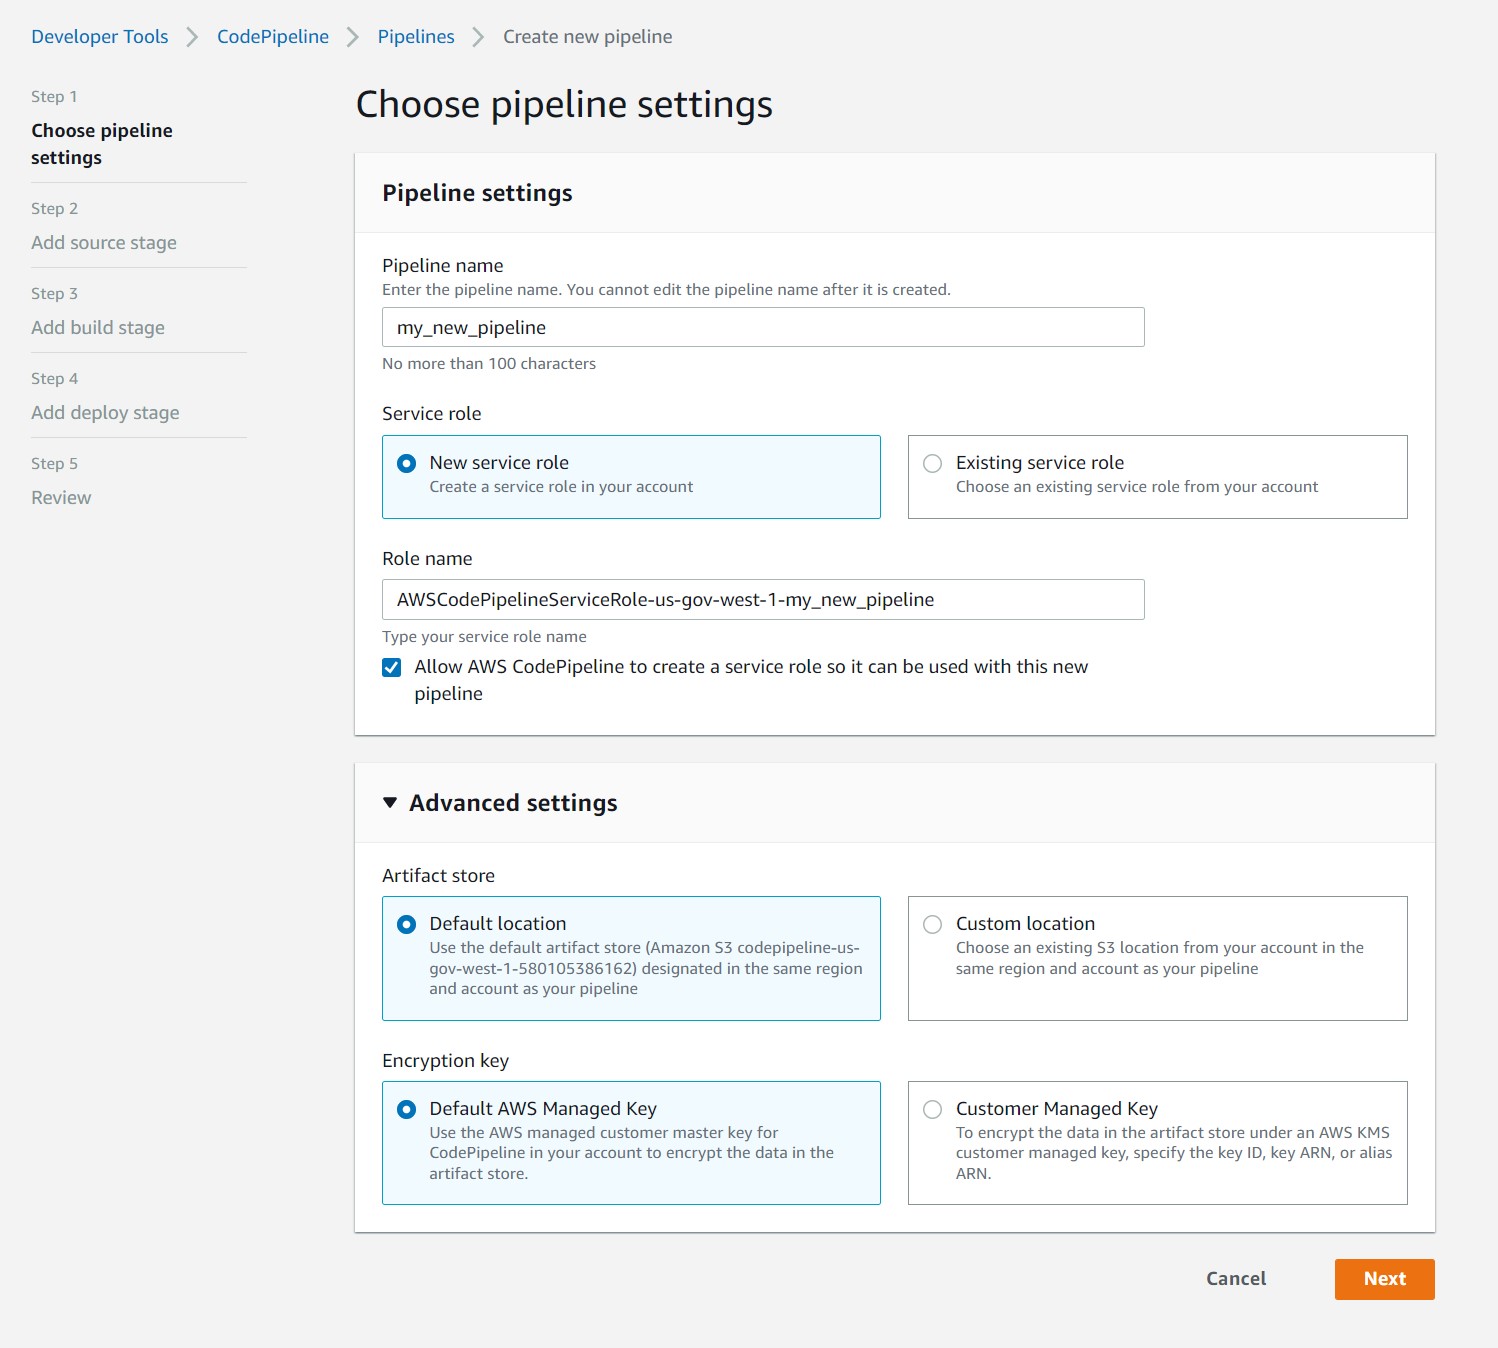
Step 1
Name your pipeline, service, etc. Then select Next
Step 2
Select Amazon ECR and the Container Image Repo Name and tag
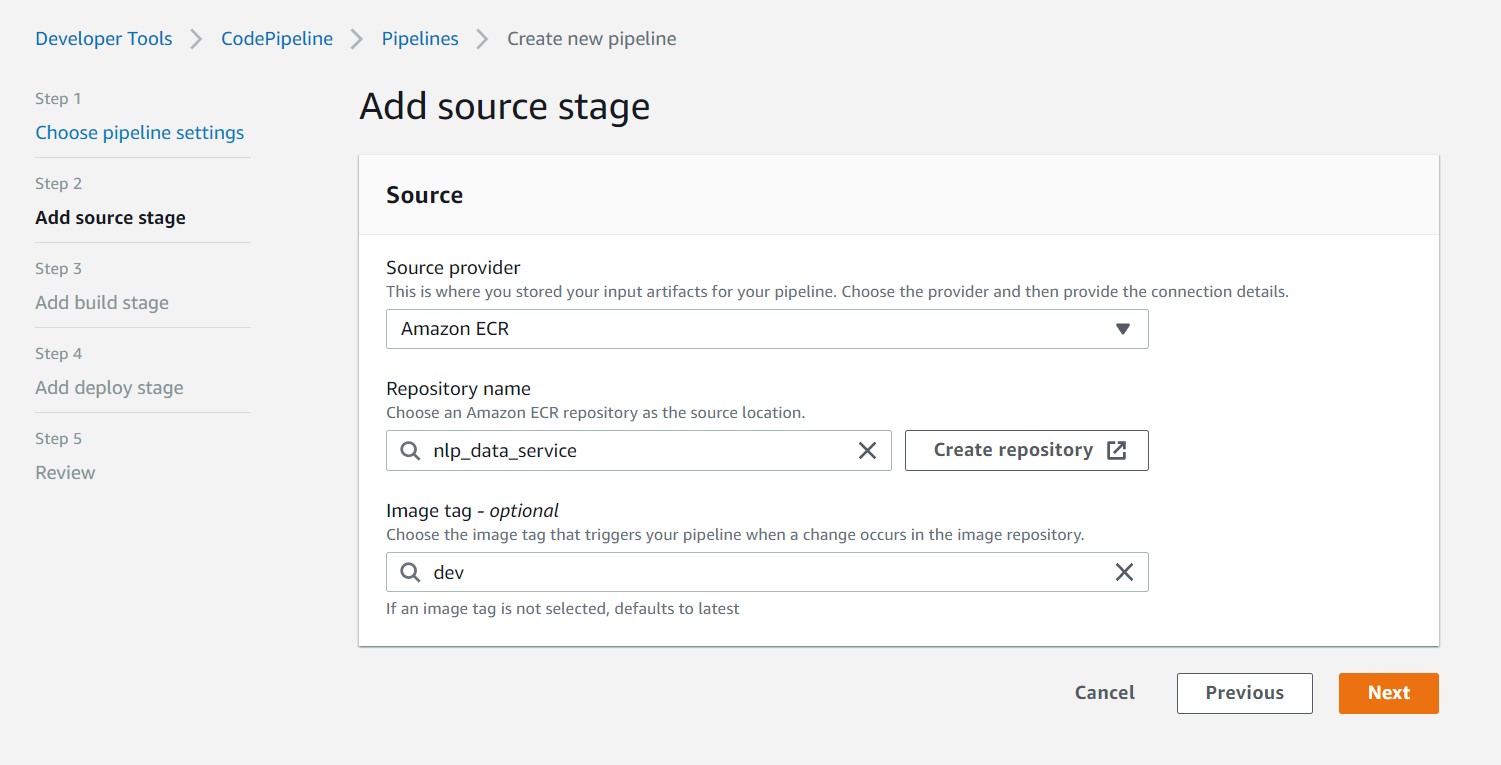
Step 3
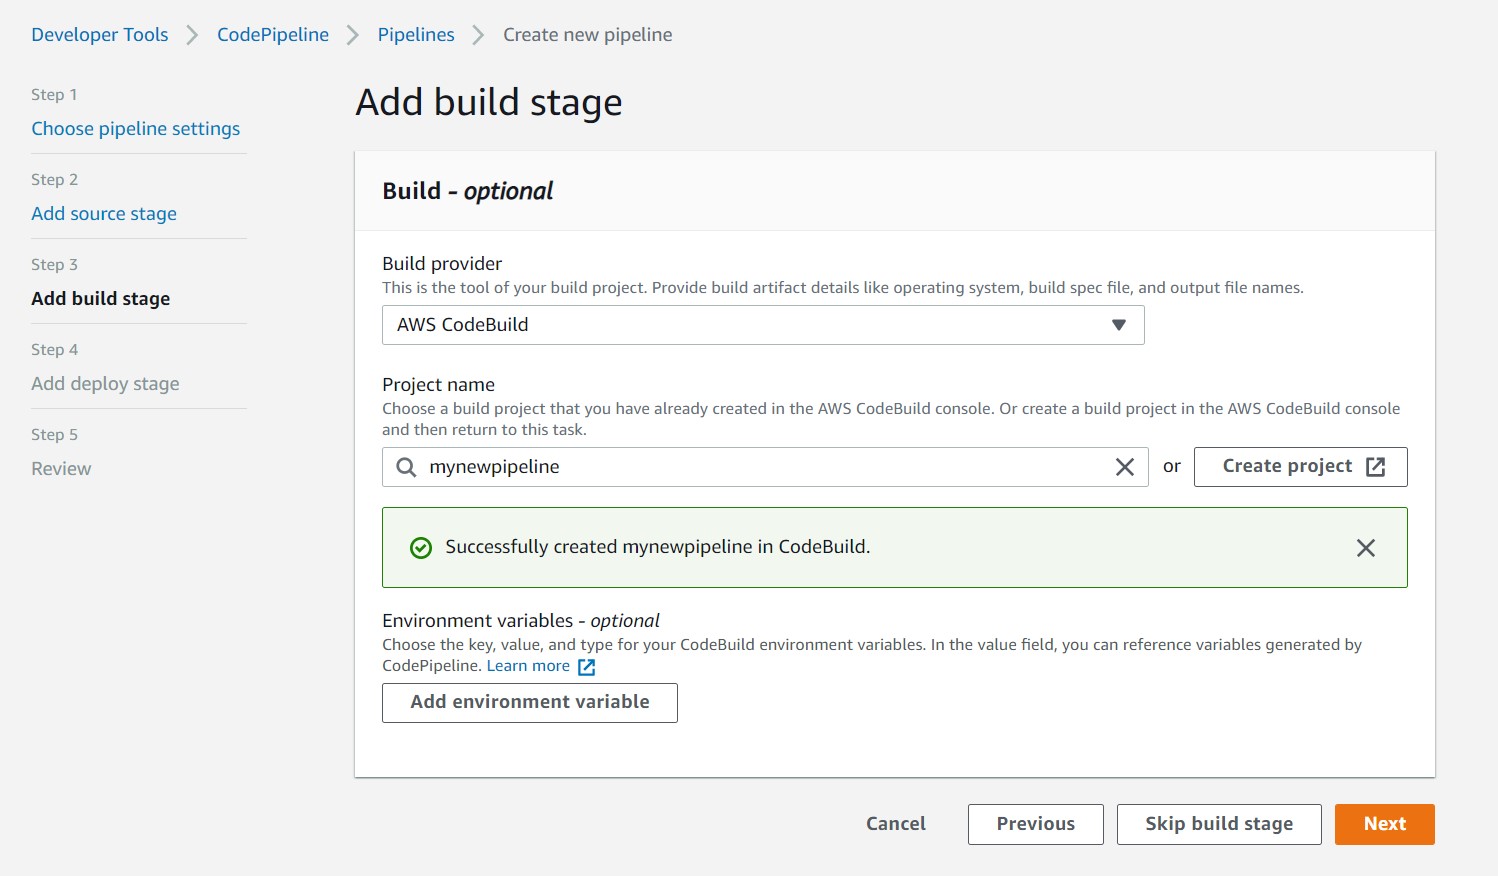
Select AWS CodeBuild then click Create Project
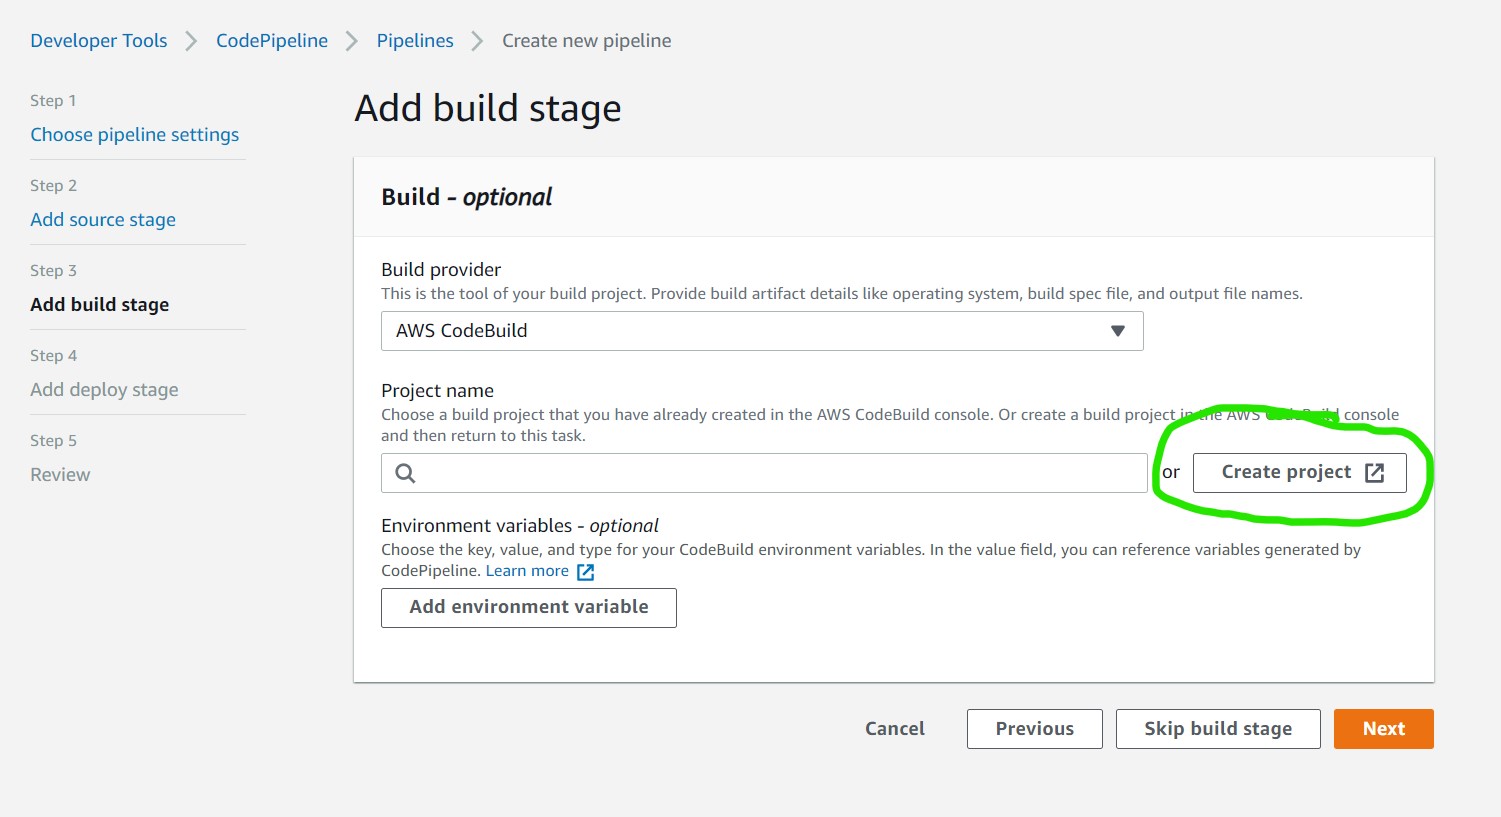
ℹ️ Clicking Create Project opens a new window with a separate form
Fill out form
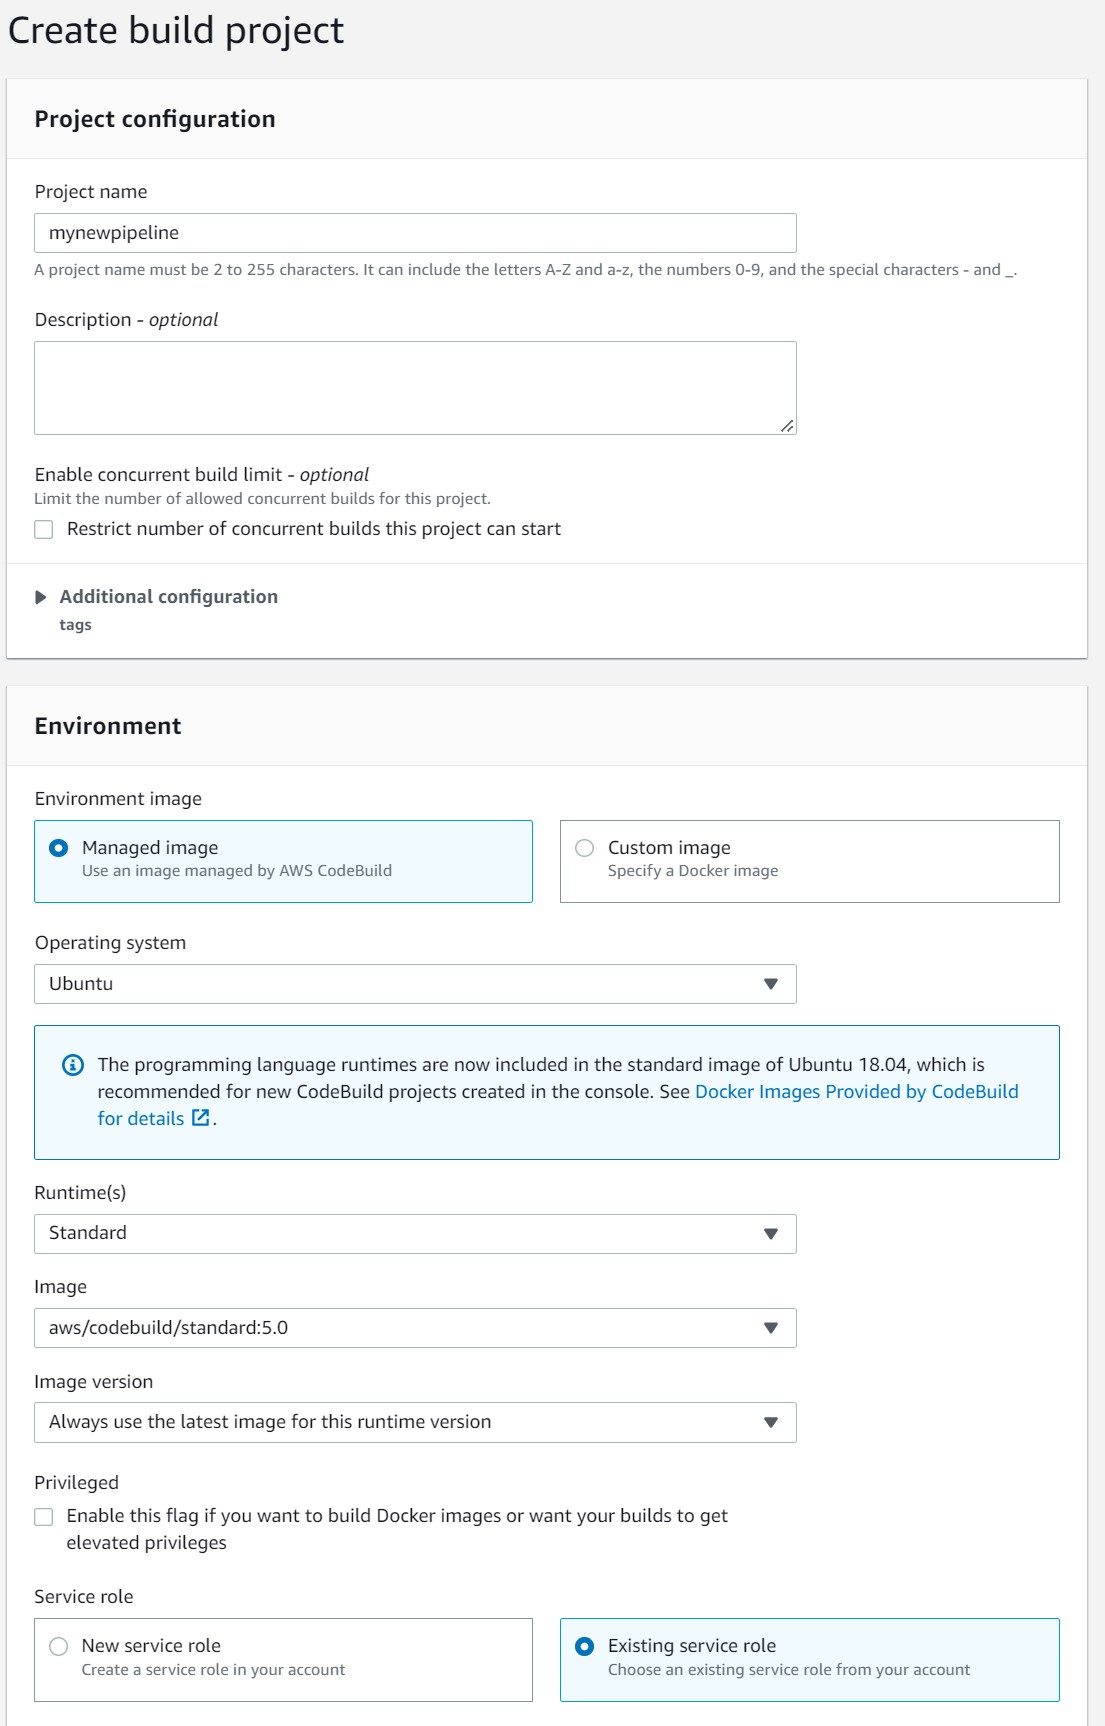
For BuildSpec select Insert Build Commands and then Editor
Copy this text to the editor
version: 0.2
phases:
    build:
        commands:
            - ContainerName="nlp_web_app"
            - ImageURI="407355966437.dkr.ecr.us-gov-west-1.amazonaws.com/nlp_web_app:prod"
            - printf '[{"name":"CONTAINER_NAME","imageUri":"IMAGE_URI"}]' > imagedefinitions.json
            - sed -i -e "s|CONTAINER_NAME|$ContainerName|g" imagedefinitions.json
            - sed -i -e "s|IMAGE_URI|$ImageURI|g" imagedefinitions.json
            - cat imagedefinitions.json

artifacts:
    files:
        - imagedefinitions.json
⚠️ The highlighted ContainerName must match the container name in the TaskDef for the service ⚠️ The highlighted ImageURI must match the container repo and tag desired
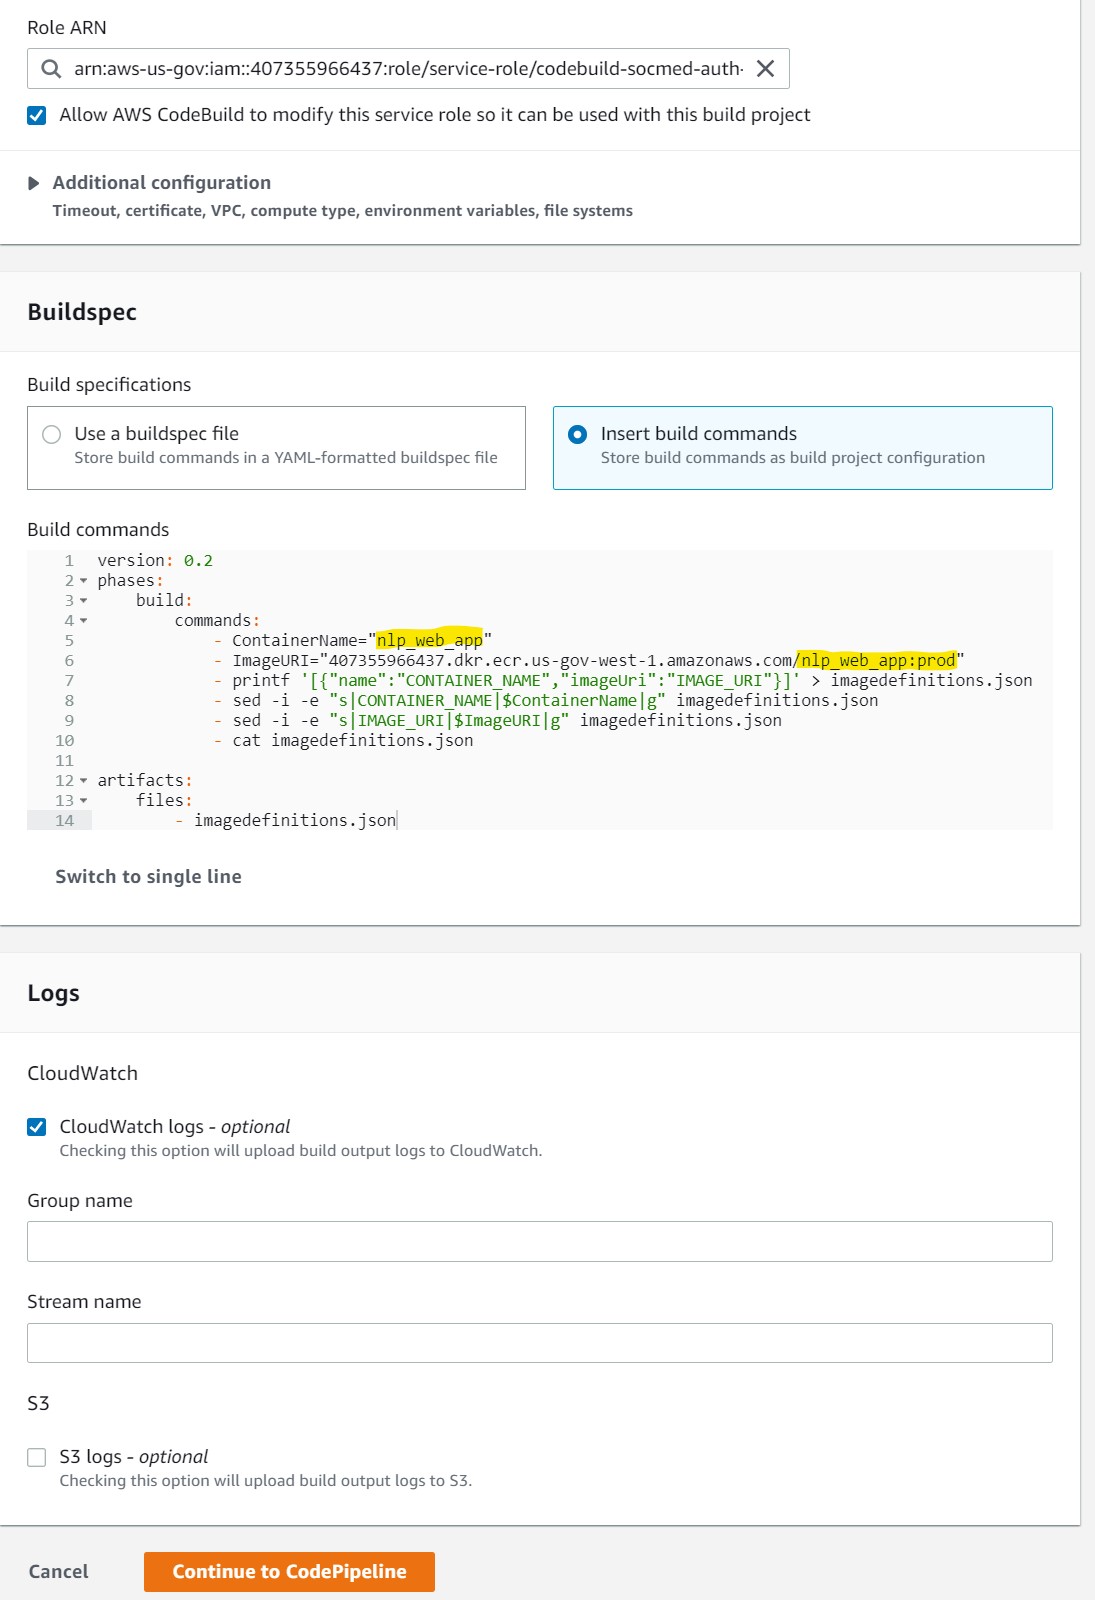
Select Continue to CodePipeline This will close the window and prompt that a Project name was created
Step 4
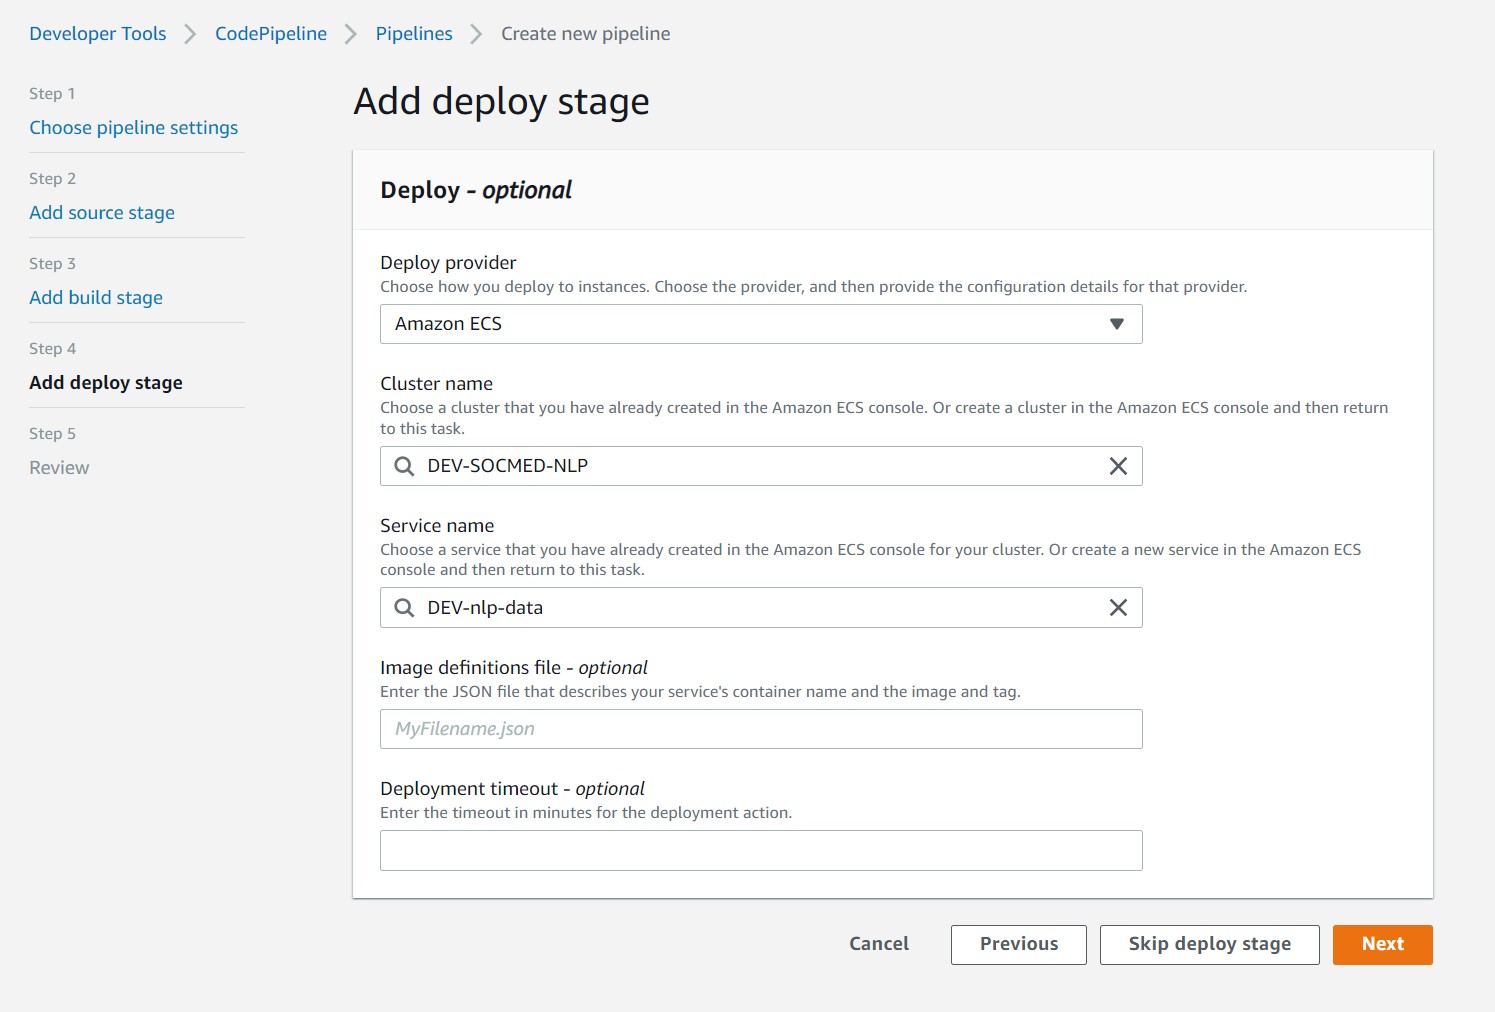
- Deploy Provider will be Amazon ECS
- Select ECS Cluster
- Select the service to update on ECR image update
- Select Next
Step 5
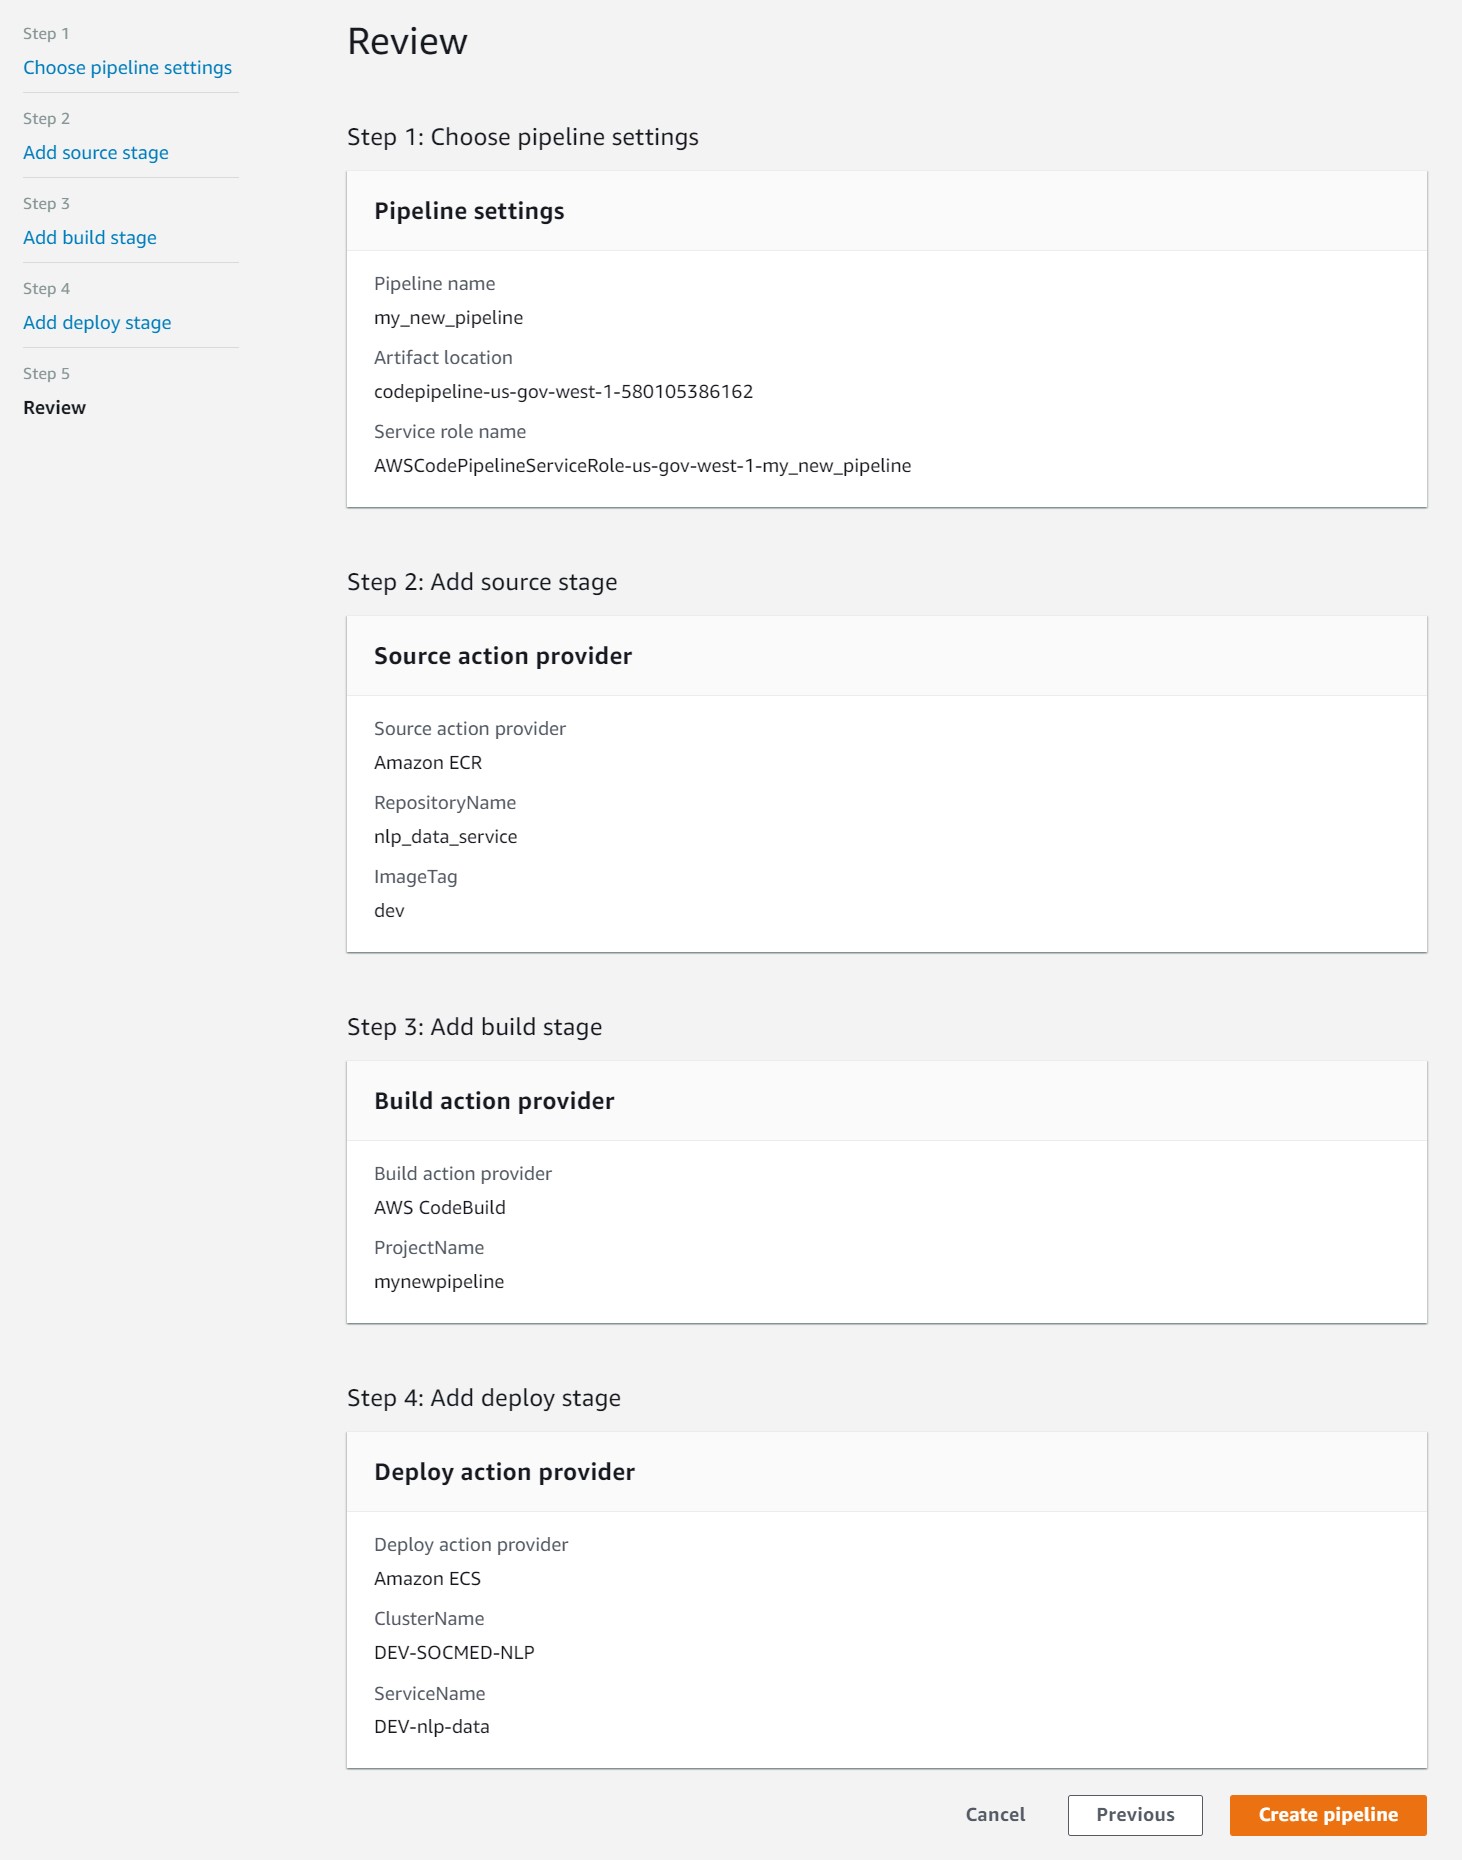
Review inputs and select Create Pipeline
Created
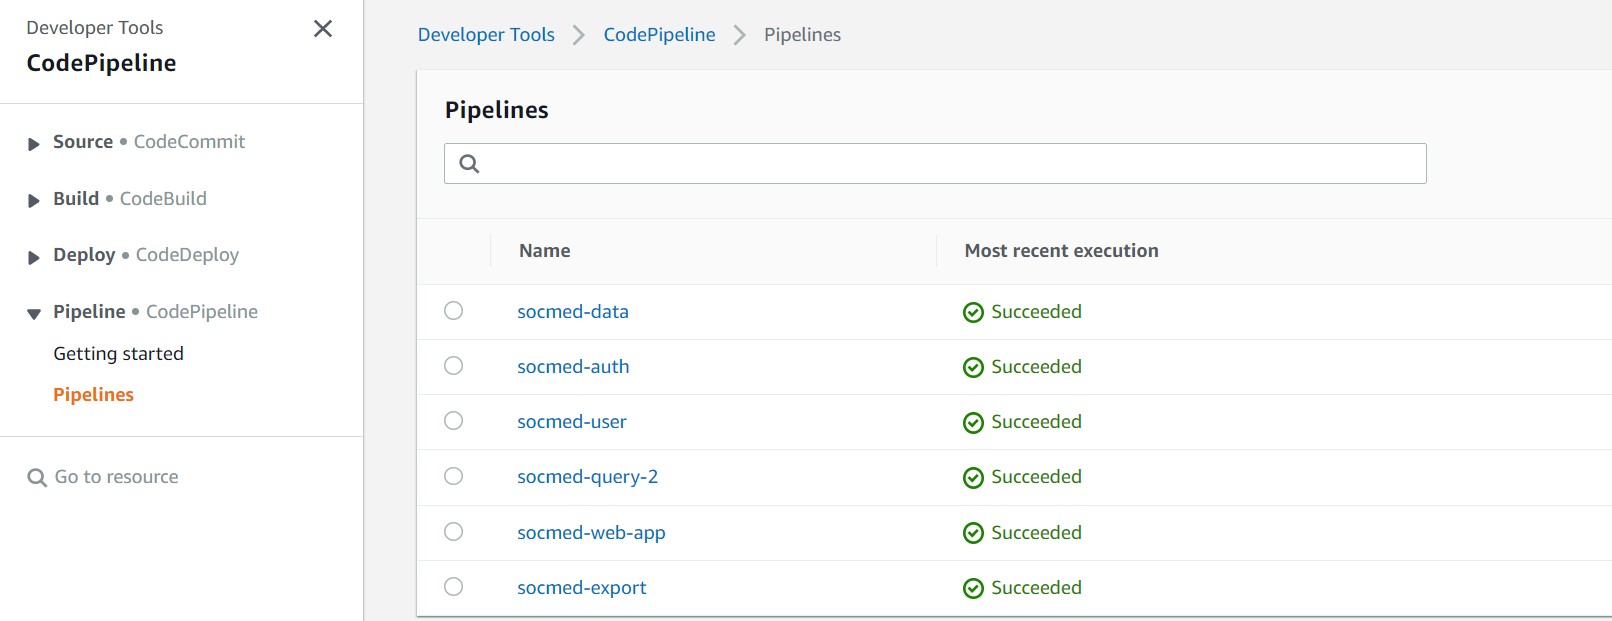
Once create you will see your pipeline listed
Test the pipeline by pushing an updated container image to ECR
AWS Relational Databases
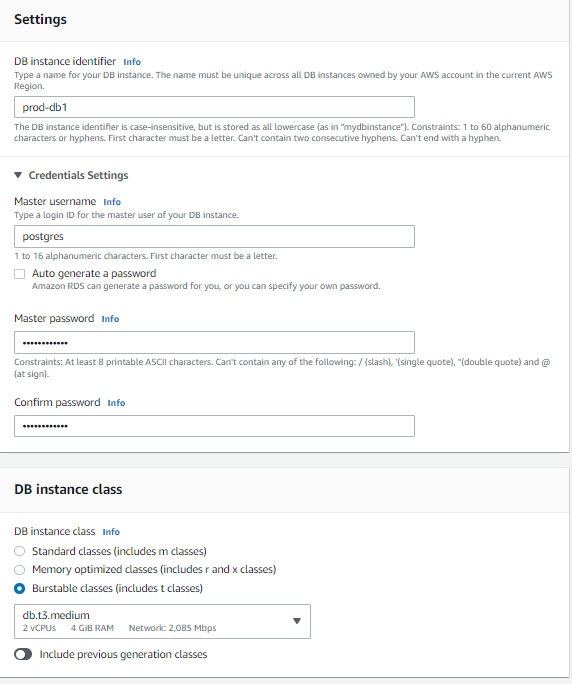
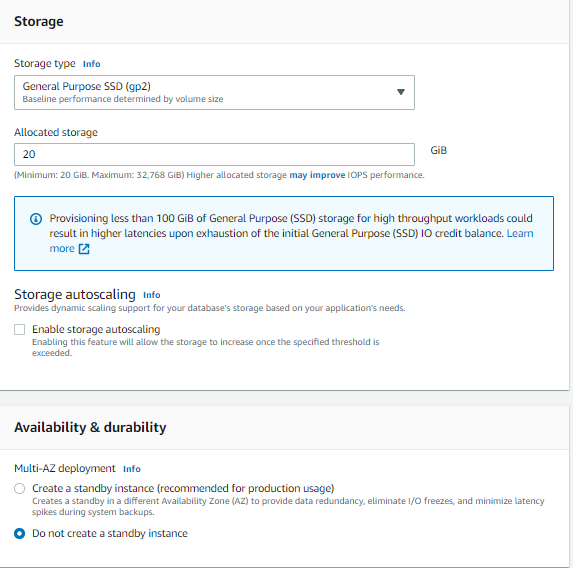
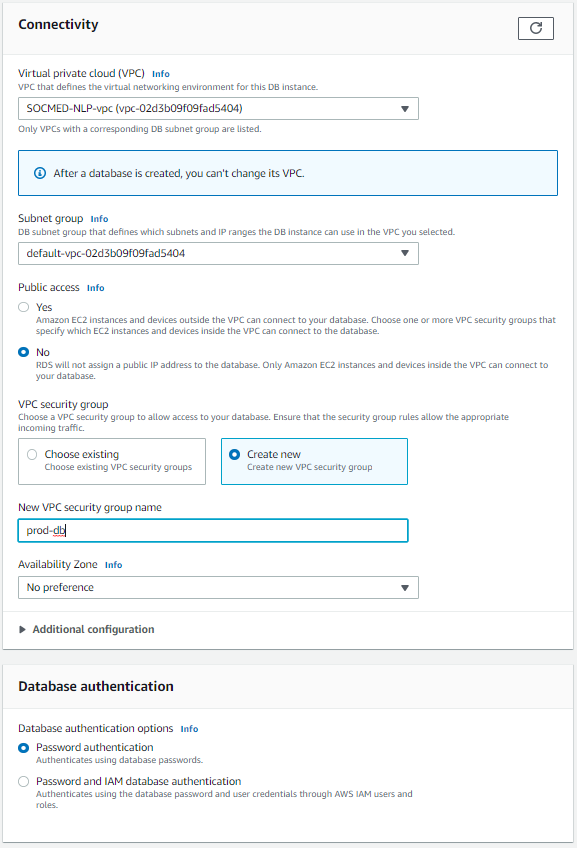
From the services tab, navigate to the RDS section, then select Create database. Follow these settings to create your production database. This will serve as the database for both PROD and DEV.
